RSS

Archive for May, 2012

Setting Up the Raspberry Pi

Thursday, May 31st, 2012

So having received a Raspberry Pi I suppose I should start to configure it to make it a little more to my taste but also to fit in with my local systems at home. To do this I am going to perform the following tasks:

  1. Install the operating system of choice (Debian 6)
  2. Resize the partitions
  3. Backing up your system
  4. Enable SSH
  5. Changing the message of the day
  6. Changing the hostname
  7. Changing prompt colours
  8. Using History

I have a habit of configuring the device using the root user. There are many debates on whether this is advisable or not. I do not normally work with the root account but for configuring machines I find it more convenient to login as root. I do this because you are often executing a large number of commands which require super user privileges and it is quicker to do this if you are not prefixing every command with the sudo command.

So in this tutorial I will be assuming that you have changed to the root account before running any of these commands. You can do this by executing the command:

sudo su

Remember, if you do this you can find yourself putting the system stability at risk if you mistype a command or execute a command accidentally. The most infamous example is deleting the entire file system by a mistyped command – you can do serious damage as superuser.

Throughout this article we will be editing text files. The editor being used is the nano text editor. It’s small, simple and already installed on the system.

These steps will also require a number of reboots. I have found that entering the following command:

ping -t 192.168.10.5

into a command prompt on my Windows machine will give me a good indication when my Raspberry Pi is ready for me to SSH back onto the device.

Installing Debian

First job is to download the operating system image from the Raspberry Pi web site. Extracting this to your hard drive leaves you with a 1.8 GByte disc image file.

This file can be written to a SD card using the Win32DiskImager (the link can also be found in the downloads section of the Raspberry Pi web site). Start this application, select the image file you have just extracted, select the location of the SD card and hit the Write button.

Once completed the SD card should be ready to use. Insert the SD card into the Raspberry Pi, connect a keyboard, mouse (optional) and monitor and you are ready to go.

Resizing the partitions

The default installation allows for the use of SD cards starting at 2GB and going upwards. This means that by default you have a single partition available to you and possibly a large amount of unused space. To use this space you really have two options, create alternative partitions and mount these or resize the existing partition to the full extent of the SD card. I personally went for the later option as I have always preferred not to have to worry about partition sizes and where I can put files.

Rather than describe this fully here I will simply point you to a rather good video on the subject on the unofficial RaspberryPiBeginners channel on YouTube.

Backing Up Your System

An important part of maintaining these systems is backing up on a regular basis. I have an 8 GByte SD card for the Raspberry Pi and a laptop with over 200 GBytes of free space. I have decided that for me I can afford a few GBytes on the laptop for an occasional full system image with some incremental backups of user files.

For a full backup of the SD card we need to use the same tool as we used to write the original image file. This time instead of writing the image we read the SD card and generate an image file. So insert the SD card into the computer’s SD card reader and select the drive containing the SD card. Enter a name for the image file and hit the Read button. At the end of the process you will have a file which can be written back to the SD card should any changes make the system un usable.

Enable SSH

I find it a little intrusive having to connect the Raspberry Pi to my monitor and USB hub as it disrupts the PC setup. To help avoid this I have setup the system to use SSH, I can then connect to the Raspberry Pi using PuTTY from the PC.

Enabling this is as simple as renaming a file and rebooting the device.

So logon to the Raspberry Pi and execute the following commands:


cd /boot
mv boot_enable_ssh.rc boot.rc

Next we need to make a note of the IP address of the device using the following command:

ifconfig

Make a note of the IP address of the device (look for the IP address in the eth0 section of the output from this command).

Now reboot the device with the following command:

reboot

The final thing to do is check that everything works. So start PuTTY (or your favourite SSH client) and connect to the machine using this client. You should see the login prompt in the client.

Changing the Message of the Day

This is a trivial task and I do this on each of my Linux machines so that I can see which machine I am connected to as soon as I login. The default message for the Debian distribution I have is as follows:

Linux raspberrypi 3.1.9+ #90 Wed Apr 18 18:23:05 BST 2012 armv6l

The programs included with the Debian GNU/Linux system are free software;
the exact distribution terms for each program are described in the
individual files in /usr/share/doc/*/copyright.

Debian GNU/Linux comes with ABSOLUTELY NO WARRANTY, to the extent
permitted by applicable law.

This file is created on system boot by a shell script. You can change the end of the file by editing the text in the file /etc/motd.tail. So simply log on to the machine and edit this file adding the text you wish to see when you login. Remember, you will need to be superuser to do this.

sudo su
cd /etc
nano motd.tail

Now restart the system and logon once more. This time you will see your modified message appearing instead of the default message.

Changing the Host Name

Changing the host name is simple and requires that two files are edited.

  • /etc/hostname
  • /etc/hosts

The hostname file should be edited to contain the host name and nothing else. In my case I am going to call this device RPiDev. So edit the hostname file using an editor such as nano, remove the existing entry and add your selected name and save the file.

The next file is a little more complex as this contains routing information for the machine. By default, this file looks like this:

::1 raspberrypi localhost6.localdomain6 localhost6
127.0.1.1 raspberrypi

127.0.0.1 localhost
::1 localhost ip6-localhost ip6-loopback
fe00::0 ip6-localnet
ff00::0 ip6-mcastprefix
ff02::1 ip6-allnodes
ff02::2 ip6-allrouters

We need to edit this file and replace all instances of the text raspberrypi with your chosen name. My hosts file now looks like this:

::1 RPiDev localhost6.localdomain6 localhost6
127.0.1.1 RPiDev

127.0.0.1 localhost
::1 localhost ip6-localhost ip6-loopback
fe00::0 ip6-localnet
ff00::0 ip6-mcastprefix
ff02::1 ip6-allnodes
ff02::2 ip6-allrouters

Changing the Prompt Colour

Working with the system in console mode can be a little dull as you only get to see text in black and white. You can add a little colour to the system by changing the prompt. I did this by editing the /etc/bash.bashrc file. You will need to be the root user to edit this file. So edit this file and about half way down you will find the following text:

PS1='${debian_chroot:+($debian_chroot)}\u@\h:\w\$ '

Try changing this to the following:

PS1='${debian_chroot:+($debian_chroot)}\! \[\033[01;32m\][\u@\h] \[\033[01;34m\]\w \$ \[\033[00m\]'

Now logout and then back in to the device. You should find your prompt has changed with the user and system name appearing in light green and the current directory appearing in a light blue.

The colour coding is performed by the text in the square brackets, particularly the [01;34m\] commands. The following colour codes can be used:

Colour Name Code
Black 00;30
Dark Gray 01;30
Blue 00;34
Light Blue 01;34
Green 00;32
Light Green 10;32
Cyan 00;36
Light Cyan 01;36
Red 00;31
Light Red 01;31
Purple 00;35
Light Purple 01;35
Brown 00;33
Yellow 01;33
Light Gray 00;37
White 01;37

Using History

In the section on changing the prompt you will see a little piece of magic when setting the PS1 variable. About half way along you will see the text:

\!

This piece of text is a special flag which indicates that the shell should insert the current history number for the command into the prompt. So on my system I use the above value for PS1 and I see the following prompt:

146 [root@RPiDev] /etc #

The number at the start of the line can be used to re-execute a particular command again. This is done by prefixing the command number with the ! character. So let’s say that command 130 was cd /etc/networks and I want to get back to this directory. I can either type the command in again or as I know this was command number 130 I can type in !130.

You can display the full history by executing the command history from the command prompt.
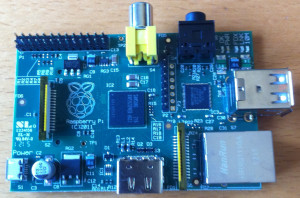
Framboise Pi est arrivée

Thursday, May 24th, 2012

I have been waiting for this event for more than a year now. The day when I would finally get my hands on a Raspberry Pi. Today it finally happened. It has been a roller-coaster ride with the initial release expected in December 2011 and launch delayed, finally announced and then over subscribed, it has been an eventful 12 months.

Today all of the waiting came to an end as the board finally arrived.

Raspberry Pi on desk

After waiting for 12 months, waiting for the end of a working day to play with the device was probably the most difficult. But at the end of the day it was time to hook up the device and power it up.

Raspberry Pi connected to hub and power,

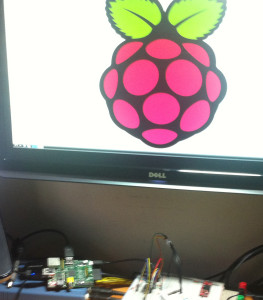
And connected to a monitor:

Raspberrry Pi hooked up to Monitor

So now I know the device is working it is time to find time to play but that will have to wait as other projects are demanding my attention. In some way this is a shame as I really believe in what this project stands for but the delays and hype have dulled the edge.

Back in the bag for another day.

The Cube Still Lives…

Monday, May 21st, 2012

The 8 x 8 x 8 LED cube has been on it’s travels again. This time it has made an appearance at the Bay Area Maker Faire:

Netduino 8x8x8 LED Cube at the Bay Area Maker Faire 2012

Thanks to fellow Netduino community member Chris Hammond for permission to use this photo.

4 Digit, 7 Segment Display

Thursday, May 17th, 2012

In early May I started working on a module to display a 4 digit number on a 7 segment LED display. I developed this as far as a working proof of concept developing the hardware and software necessary to prove that the module was feasible. At this point I discovered that development was ongoing by two other teams and decided to stop development at this point taking what I had learnt onboard and move on to other projects.

This article presents the work so far as this is a working project and demonstrates some of the principles used in the STM8S articles written so far this month. Namely:

  • GPIO output
  • Timers

As already stated, this project is working but incomplete and there is no intention to take the hardware further than the proof of concept as presented here.

Hardware Design

The system will use four 7-segment LED modules in place of a single 4 digit, 7 segment module. The hardware design requires the following circuit components:

  • Microprocessor controller
  • Power supply to the 7-segment display modules
  • Decoding for the 7-segments

The software will use multiplexing to allow one chip to be used to control the four 7-segment modules. The basic process is as follows:

  1. Turn power to all segments off
  2. Send the data for a digit to the 74LS47 chip
  3. Turn on the power for the digit
  4. Wait a short time
  5. Move on to the next digit and go back to start

This will give the illusion that all of the LEDs are powered all of the time.

Microcontroller

The microcontroller chosen was the STM8S003 as this is supported by the Netduino team for designers who wish to create their own modules. This chip has several free development environments available and the IAR environment has been used in this blog to document several small projects using this family of chips.

The project as it stands requires the use of 9 pins from the STM8S. Four pins will be used for power control, one line per digit. A further four pins will be used to tell the 74LS47 which of the segments are to be lit. The final pin will be used to indicate if the digit zero is to be shown for a zero value. More on this in the decoding section below. The use of this number of pins makes this unsuitable as it stands for use as a Netduino GO! module. Further refinement is required to take this forward as a module.

7-segment Power Control

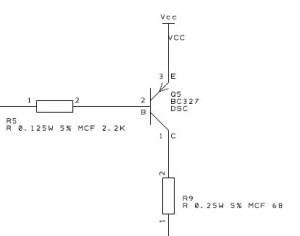
The LED power is controlled by using a PNP transistor (the 7-segments share a common anode). In this circuit the power is run through a single current limiting resistor. This will mean that numbers with few digits (for example, 1) will be displayed more brightly then those with a large number of segments (say 8). The final circuit would need to refined to have a current limiting resistor per segment or using a constant current driver. This component of the circuit looks like this:

Power control for a single 7-segment LED module.

The resistor R5 is connected to the output of the microcontroller and the output of R9 going through to the power pin on the 7-segment display.

Decoding the 7-segments

The decoding of the output from the microcontroller is performed by the 74LS47 chip. This is a dedicated decoder circuit for common anode 7-segment LED modules. The system takes a binary coded decimal number and then sinks the current from the appropriate segments of the display. The result is that the module will display the appropriate digit.

We will also take advantage of one final line, the RBI line. By turning this line on and off we can determine if the digit will display the digit 0 when the input to the decoder is zero. So why would we change this line? We we could fix the line so that a digit will always be displayed. So when the microcontroller wants to show 0 it will actually show either a blank display or 0000. The blank display is obviously not desirable as the user will not be able to determine if the display is showing 0 or if it is turned off. Showing four zeroes will give the user the correct information. A nicer solution is for the display to show a single zero when the microcontroller outputs 0.

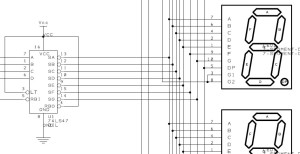
The resulting decoder wiring looks something like the following:

7-segment decoder circuit

Where pins A, B, C and D will output the binary version of the digit to be displayed.

Full Circuit

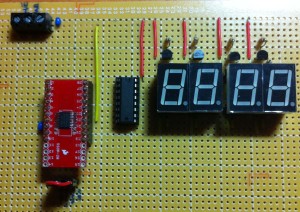
This PDF File contains the full circuit diagram for the proof of concept module. The fully assembled circuit looks like this:

Prototype Circuit

Software

In order to test the circuit we will write a small program which will start at 0 and count to 9999 before returning to 0 and starting counting again.

The first thing we need to do is to initialise the system. The following code resets the system clock source, configures the GPIO lines and then starts the timer which contain the code which will perform the multiplexing.

//
//  Initialise the clock
//
CLK_DeInit();
CLK_SYSCLKConfig(CLK_PRESCALER_CPUDIV1);                // CPU Prescaler = 1.
CLK_SYSCLKConfig(CLK_PRESCALER_HSIDIV1);                // Prescaler = 1, 16 MHz.
CLK_ClockSwitchConfig(CLK_SWITCHMODE_AUTO,              // Automatically switch
					  CLK_SOURCE_HSE,                   // Switch to internal timer.
					  DISABLE,                          // Disable the clock switch interrupt.
					  CLK_CURRENTCLOCKSTATE_DISABLE);   // Disable the previous clock.
//
//  Initialise GPIOs
//
GPIO_DeInit(GPIOC);
GPIO_Init(DIGIT0_BI_PORT, DIGIT0_BI_PIN, GPIO_MODE_OUT_PP_LOW_FAST);
GPIO_Init(DIGIT1_BI_PORT, DIGIT1_BI_PIN, GPIO_MODE_OUT_PP_LOW_FAST);
GPIO_Init(DIGIT2_BI_PORT, DIGIT2_BI_PIN, GPIO_MODE_OUT_PP_LOW_FAST);
GPIO_Init(DIGIT3_BI_PORT, DIGIT3_BI_PIN, GPIO_MODE_OUT_PP_LOW_FAST);
GPIO_Init(DIGIT_A0_PORT, DIGIT_A0_PIN, GPIO_MODE_OUT_PP_LOW_FAST);
GPIO_Init(DIGIT_A1_PORT, DIGIT_A1_PIN, GPIO_MODE_OUT_PP_LOW_FAST);
GPIO_Init(DIGIT_A2_PORT, DIGIT_A2_PIN, GPIO_MODE_OUT_PP_LOW_FAST);
GPIO_Init(DIGIT_A3_PORT, DIGIT_A3_PIN, GPIO_MODE_OUT_PP_LOW_FAST);
GPIO_Init(RBI_PORT, RBI_PIN, GPIO_MODE_OUT_PP_LOW_FAST);
//
//  Setup timer 2 to interrupt every 2048 clock pulses.
//
TIM2_DeInit();
TIM2_TimeBaseInit(TIM2_PRESCALER_2048,      // Interrupt every 2048 clock pulses.
				  1);                       // Period is one.
TIM2_ITConfig(TIM2_IT_UPDATE, ENABLE);      // Enable the overflow interrupt.
TIM2_Cmd(ENABLE);

The next thing we need to do is to look at displaying a digit. To do this we will turn off all of the digits and then convert the digit into binary outputting the value on the four pins connected to the 74LS47 decoder.

GPIO_WriteHigh(DIGIT0_BI_PORT, DIGIT0_BI_PIN);
GPIO_WriteHigh(DIGIT1_BI_PORT, DIGIT1_BI_PIN);
GPIO_WriteHigh(DIGIT2_BI_PORT, DIGIT2_BI_PIN);
GPIO_WriteHigh(DIGIT3_BI_PORT, DIGIT3_BI_PIN);
if (digit & 0x01)
{
	GPIO_WriteHigh(DIGIT_A0_PORT, DIGIT_A0_PIN);
}
else
{
	GPIO_WriteLow(DIGIT_A0_PORT, DIGIT_A0_PIN);
}
if (digit & 0x02)
{
	GPIO_WriteHigh(DIGIT_A1_PORT, DIGIT_A1_PIN);
}
else
{
	GPIO_WriteLow(DIGIT_A1_PORT, DIGIT_A1_PIN);
}
if (digit & 0x04)
{
	GPIO_WriteHigh(DIGIT_A2_PORT, DIGIT_A2_PIN);
}
else
{
	GPIO_WriteLow(DIGIT_A2_PORT, DIGIT_A2_PIN);
}
if (digit & 0x08)
{
	GPIO_WriteHigh(DIGIT_A3_PORT, DIGIT_A3_PIN);
}
else
{
	GPIO_WriteLow(DIGIT_A3_PORT, DIGIT_A3_PIN);
}
GPIO_WriteLow(port, pin);

The final statement will turn on the PNP transistor connected to the selected digit by connecting the base of the transistor to ground.

The final piece of code we need (before the main program loop) is the interrupt handler for the timer. This will turn off all of the power to the LED modules and then work out which digit to show and write the data to the 74LS47 decoder. This interrupt service routine can be found in the file stm8s_it.c. See previous STM8S post on interrupts for further information. Look for the following code in this file:

INTERRUPT_HANDLER(TIM2_UPD_OVF_BRK_IRQHandler, 13)
{
}

And replace with the following code:

INTERRUPT_HANDLER(TIM2_UPD_OVF_BRK_IRQHandler, 13)
{
    if (_currentDigit == 0)
    {
        DisplayDigit(_displayValue[0], DIGIT0_BI_PORT, DIGIT0_BI_PIN);
        GPIO_WriteHigh(RBI_PORT, RBI_PIN);
        _currentDigit++;
    }
    else
    {
        if (_currentDigit == 1)
        {
            DisplayDigit(_displayValue[1], DIGIT1_BI_PORT, DIGIT1_BI_PIN);
            if ((_displayValue[2] != 0) || (_displayValue[3] != 0))
            {
                GPIO_WriteHigh(RBI_PORT, RBI_PIN);
            }
            else
            {
                GPIO_WriteLow(RBI_PORT, RBI_PIN);
            }
            _currentDigit++;
        }
        else
        {
            if (_currentDigit == 2)
            {
                DisplayDigit(_displayValue[2], DIGIT2_BI_PORT, DIGIT2_BI_PIN);
            if (_displayValue[3] != 0)
            {
                GPIO_WriteHigh(RBI_PORT, RBI_PIN);
            }
            else
            {
                GPIO_WriteLow(RBI_PORT, RBI_PIN);
            }
                _currentDigit++;
            }
            else
            {
                DisplayDigit(_displayValue[3], DIGIT3_BI_PORT, DIGIT3_BI_PIN);
                GPIO_WriteLow(RBI_PORT, RBI_PIN);
                _currentDigit = 0;
            }
        }
    }
    TIM2->SR1 = (uint8_t) (~(uint8_t) TIM2_IT_UPDATE);  // Clear the interrupt.
}

One interesting thing to look at is the setting of the RBI_PORT. Note that this is set to high for the first digit (i.e. rightmost digit) and low for all of the other digits. This is the piece of magic which ensure that we always display a digit for zero in the rightmost digit but only display a value for no zero digits on the remaining three digits.

If this were to be taken forward then the code above would need to be optimised to ensure that the ISR completed in the shortest time possible.

Now we have all of the elements in place we can start to write our main program loop. The code will loop from 0 to 9999 displaying each digit and the restarting the count. The individual digits will be put into an array of four integers, one for each LED in the display. This gives us the following code:

enableInterrupts();                         // Make sure interrupts are enabled.
int value = 0;
while (1)
{
	_displayValue[0] = value % 10;
	_displayValue[1] = (value / 10) % 10;
	_displayValue[2] = (value / 100) % 10;
	_displayValue[3] = (value / 1000) % 10;
	if (value == 9999)
	{
		value = 0;
	}
	else
	{
		value++;
	}
	//
	//  Now delay otherwise we'll be counting too fast for anything
	//  to appear on the display.
	//
	for (int outerDelay = 0; outerDelay < 5; outerDelay++)
	{
		for (int delay = 0; delay < 0xffff; delay++)
		{
			nop();
		}
	}
}

The full source code for this project can be downloaded here.

Conclusion

This was an interesting project to put together and took about a day to work out and get everything working. To take this further would take a lot more work, many times the amount already put into the project. As two other groups are working on similar ideas I have decided to archive this for now and move on to other projects.

STM8S SPI

Wednesday, May 16th, 2012

In this latest in the series I am taking a look at communication between two systems (namely a Netduino Mini and a STM8S103) using SPI.

As with previous articles the system will use the IAR compiler and the STD Peripheral Library. The Netduino Mini will use Visual Studio and .NET to act as the master for the SPI bus.

I ran into some problems along the way and had to ask for help in the Netduino Forums. Special mention to Chris Walker and CW2 for their help.

Netduino Mini Application

SPI is one of the protocols supported by the NETMF framework on the Netduino platform. As such there is little work to do. The Mini will have to act as the SPI master as this is the only role which is supported on the Netduino for this bus. We simply need to set up the SPI bus with the correct parameters and then start writing data to the bus.

To remove as many possible problems as possible we will perform a simple task, have the Netduino Mini write some data to the bus on a regular basis. In this case we will write three bytes with the values 1, 2 and 3. The code on the Mini is as simple as the following:

public static void Main()
{
	SPI.Configuration config = new SPI.Configuration(SPI_mod: SPI.SPI_module.SPI1,
							   ChipSelect_Port: Pins.GPIO_PIN_5,                        // Enable pin is D5.
							   ChipSelect_ActiveState: false,                           // Active Low
							   ChipSelect_SetupTime: 0,                                 // 0 uS setup time.
							   ChipSelect_HoldTime: 0,                                  // 0 uS hold after data transmission has completed.
							   Clock_IdleState: false,                                  // Clock line is low when the device is inactive.
							   Clock_Edge: false,                                       // Data is sampled on the clock falling edge.
							   Clock_RateKHz: 500);                                     // 500 KHz clock speed.

	SPI spi = new SPI(config);

	byte[] buffer = new byte[] { 1, 2, 3 };
	while (true)
	{
		spi.Write(buffer);
		Thread.Sleep(1000);
	}
}

This code configures the bus as follows:

  • Chip select will be D5 on the Netduino Mini
  • Chip select will be active low
  • Clock is low when the device is inactive
  • Data is sampled on the falling edge of the clock signal
  • Clock rate is 500 KHz

The selection of these values is deliberate as they match the values used on the GO! bus.

STM8S Code

This is where it got tricky and where I need some help. We have a simple application on the Netduino Mini which simply sends out three bytes, waits a second and then repeats. In order to know that we have received this data OK, the application on the STM8S will read these bytes from the SPI bus, add 100 and then send the result back to the Mini.

The first thing we need to do is to set up a project similar to the first article in this series. The main STD Peripheral Library module we will be using here is the SPI library which can be found in stm8s_spi.c. Add this to the project and then reference the stm8s_spi.h in the main program file.

Now we have the SPI library referenced and the library file added to the application we need to start using it. So the first step we need to take is to configure the library ready for use. The following code should achieve this matching the parameters we have set up in Netduino Mini project above.

SPI_DeInit();
SPI_Init(SPI_FIRSTBIT_MSB,                      // MSB first.
		 SPI_BAUDRATEPRESCALER_32,              // For slave comms this does not matter as the clock is controlled by the master.
		 SPI_MODE_SLAVE,                        // SPI Slave
		 SPI_CLOCKPOLARITY_LOW,                 // Clock is high when the bus is idle.
		 SPI_CLOCKPHASE_2EDGE,                  // Falling clock edge clocks the first data bit.
		 SPI_DATADIRECTION_2LINES_FULLDUPLEX,   // Full duplex transmission.
		 SPI_NSS_HARD,                          // Disable slave management by software.
		 0x07);                                 // CRC style.
SPI_ITConfig(SPI_IT_RXNE, ENABLE);              // Interrupt when the Rx buffer is not empty.
SPI_ITConfig(SPI_IT_TXE, ENABLE);               // Interrupt when the Tx buffer is empty.

The first this we do is call SPI_DeInit to reset any SPI bus configuration.

Next we call SPI_Init to configure the system, as a SPI slave using the same parameters as the SPI master (i.e. the Netduino Mini). You should not that although the baud rate prescalar parameter is set here it will be ignored. The master controls the clock on the SPI bus.

The final two statements (SPI_ITConfig statements) determine which actions will generate an interrupt. In this case we are instructing the system to generate an interrupt in the following cases:

  • When the Rx buffer is not empty (i.e. data has been received)
  • When the Tx buffer is empty (i.e. the system is ready to send more data)

Interrupt Handler

The data will be handled by an interrupt handler. This handler will be called when we need to send data or when we have data ready for processing. As before, the handlers can be found in the file stm8s_it.c. The handler we will be looking for is the SPI_IRQHandler. Locate this handler and replace the code with the following:

INTERRUPT_HANDLER(SPI_IRQHandler, 10)
{
    if (SPI->SR & SPI_SR_RXNE)
    {
        //  u8 ch = SPI_ReceiveData();
        u8 ch = SPI->DR;
        //  SPI_SendData(ch + 100);
        SPI->DR = ch + 100;
    }
    SPI->SR = (u8) 0;
}

The two lines commented out are the equivalent calls into the SPI library. Remember that ISR’s should be as fast as possible. Replacing the calls with the appropriate expansions will decrease the amount of time required to execute the ISR.

So, here we check to see if the ISR is being called because the Rx buffer is not empty. If the buffer is not empty then we extract the value from the buffer, add 100 to it and then put this in the Tx buffer.

The final thing we do is to clear the interrupt from the status register.

Main Program Loop

The code in the main program queues up a byte ready for transmission, enables the interrupts and then repeatedly waits for more interrupts. The code looks like this:

int main(void)
{
    Initialise();
    SPI_SendData('*');                          // Ready to send before master can initiate transfer.
    enableInterrupts();                         // Make sure interrupts are enabled.
    while (1)
    {
        wfi();
    }
}

So What Happened?

After spending a fair amount of time with the logic analyser and the debugger I hit a brick wall. The interrupts we not getting fired as I expected. This is where Chris Walker and CW2’s help was required. The point I was missing regarded the SPI_NSS signal. On the STM8S103 chip I was using this function is an alternative function for the labelled pin. In order to allow this pin to act as the chip select for the SPI bus it was necessary to set the alternative function register on the chip. Once this was set correctly the system started to generate interrupts as expected.

STM8S Interrupts With the STD Peripheral Library

Saturday, May 12th, 2012

So you have just purchased that wonderful sensor and now need it to grab the attention of the STM8S – enter the interrupt. In this post I will run through how to set up a GPIO port to have an incoming logic signal generate an interrupt.

As in previous posts on the STM8S, this post will use the IAR development environment and the STD Peripheral Library from ST.

Configuring the Port

The first step is to configure a port for input. The following code configures a pin on GPIOB for input:


GPIO_DeInit(GPIOB);
GPIO_Init(GPIOB, GPIO_PIN_5, GPIO_MODE_IN_FL_IT);

the next thing we need to do is to tell the system that this pin is allowed to generate an interrupt:


EXTI_SetExtIntSensitivity(GPIOB, 
                          EXTI_SENSITIVITY_RISE_ONLY);

So that should be all that’s required to configure the system to accept interrupts. Now we just need to process them.

Interrupt Handler

If you have followed my previous posts you will know that we need to copy some standard files across in order to access the STD Peripheral Library. One of the files we add to the project is stm8s_it.c. This holds the interrupt table for the chip. Scroll through the file and you will eventually reach some code which looks like this:


INTERRUPT_HANDLER(EXTI_PORTB_IRQHandler, 4)
{
  /* In order to detect unexpected events during development,
     it is recommended to set a breakpoint on the following instruction.
  */
}

Just place the code to be executed in this method. Remember, interrupt handlers should be small and concise.

Modules

This post requires that you add the code files for the following STD Peripheral Library modules:

  • stm8s_gpio.c
  • stm8s_exti.c

Conclusion

A relatively short post but there’s not much too it. I have successfully used this code to generate an interrupt from a sensor which generates a square wave of up to 500 KHz. The conditions I was using it in gave a maximum frequency of 20 KHz.

STM8S Timers

Saturday, May 12th, 2012

This post has been superseded by the post Using Timers on the STM8S in The Way of the Register series.

In the first post about this chip I showed how the internal clock could be output on a single pin. Here I am going to use one of the internal timers to generate my own clock signal. So in this post we will use two new concepts:

  • GPIO pins to output a signal.
  • Timer 2 to control the timing
  • Interrupt Service Routines (ISR) to do the work

The program will work by setting up timer 2 to generate an interrupt on a regular basis. When the timer interrupt fires we will reverse the direction of a GPIO pin. The net result will be a clock signal with a frequency of twice that of the timer.

As with the previous post I will be using the IAR environment with the STD Peripheral Library.

Setting up the GPIO

The application sets up the GPIO port using the following code:

#define CLOCK_OUTPUT_PORT       GPIOD
#define CLOCK_OUTPUT_PIN        GPIO_PIN_3

These #defines hold the port and pin numbers we are going to use for the clock signal. So in this case we are using pin 3 on port D. Next we need to configure the port.

GPIO_DeInit(CLOCK_OUTPUT_PORT);
GPIO_Init(CLOCK_OUTPUT_PORT, CLOCK_OUTPUT_PIN, GPIO_MODE_OUT_PP_LOW_FAST);

The first statement resets the port so that we can configure the port. The second sets up pin 3 of port D for use. Note that you can use each pin on a port in a different way, so we could have pin 2 on port D as an input whilst pin 3 is an output. To do this you simply add more GPIO_Init statements under the first. Now let’s have a look at the final parameter to the GPIO_Init statement. This defines how the pin will be set up for us. You can decode this as follows:

  • GPIO_MODE_OUT – this is an output port
  • PP – the pin will be used in Push-Pull (as opposed to open drain). This means Setting the pin to 1 will make the pin high, setting it to 0 will make it low.
  • LOW – the pin will start out low
  • FAST – the pin will be used for fast signalling.

Setting up Timer 2

Next step is to configure the timer to interrupt on a regular basis. The first step is to set up the clock to use a known clock signal. For simplicity we will set this up to use the internal high speed clock source which runs at 16MHz. This code is similar to the code in the first post.

CLK_DeInit();
CLK_SYSCLKConfig(CLK_PRESCALER_CPUDIV1);                // CPU Prescaler = 1.
CLK_SYSCLKConfig(CLK_PRESCALER_HSIDIV1);                // Prescaler = 1, 16 MHz.
CLK_ClockSwitchConfig(CLK_SWITCHMODE_AUTO,              // Automatically switch
                      CLK_SOURCE_HSI,                   // Switch to internal timer.
                      DISABLE,                          // Disable the clock switch interrupt.
                      CLK_CURRENTCLOCKSTATE_DISABLE);   // Disable the previous clock.

The only real difference is that the prescaler for the system clock is set to 1 to give the full clock speed.

The next task is to set up the timer to run at a particular frequency:

TIM2_DeInit();
TIM2_TimeBaseInit(TIM2_PRESCALER_4096,      // Interrupt every 4096 clock pulses.
                  1);                       // Period is one.
TIM2_ITConfig(TIM2_IT_UPDATE, ENABLE);      // Enable the overflow interrupt.
TIM2_Cmd(ENABLE);

The comment interrupt every half millisecond is approximate as you will see when we come to take some measurements later.

The Interrupt Service Routine

The final piece of the puzzle is the interrupt service routine. These should always be small and fast. In this case we will simply toggle the specified clock pin to generate a clock signal.

All of the ISR’s are defined in the file stm8s_it.c. The ISR we will be working with is the timer 2 update overflow handler. This will fire when the counter for the timer overflows or becomes zero and the specified number of occurrences of this event have occurred. So in this file we need to locate this code:

INTERRUPT_HANDLER(TIM2_UPD_OVF_BRK_IRQHandler, 13)
{
}

and translate it to this:

INTERRUPT_HANDLER(TIM2_UPD_OVF_BRK_IRQHandler, 13)
{
    GPIO_WriteReverse(CLOCK_OUTPUT_PORT, CLOCK_OUTPUT_PIN);     // Generate a clock signal.
    TIM2->SR1 = (uint8_t) (~(uint8_t) TIM2_IT_UPDATE);          // Clear the interrupt.
}

The first line of the ISR toggles the specified bit. The second line is important as this clears the interrupt. If we do not do this then the system will return to this ISR as soon as we exit the routine.

Clock Signal

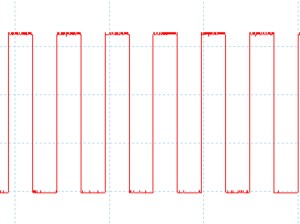
Compiling and deploying this code to the processor results in the following output on pin 3 of port D:

One millisecond clock signal on port D, pin 3.

The scope we set up for 2 milliseconds per division and this looks about right. The exact frequency count comes out to be 976.6 Hz which is right if you divide the clock signal by the prescaler.