Visual Studio and the Raspberry Pi
Sunday, April 12th, 2015The last few months have seen me turn my attention to the Raspberry Pi. The new Model B 2 offers some performance and memory improvements over the previous models and it has started to become more attractive as a development platform for embedded projects. Being a long term C/C++ developer I wanted an effective development environment for C++ development on the Raspberry Pi. One of the best and simplest development environments to setup on the PC is Microsoft Visual Studio. A recent article in The Mag Pi (Introducing the “game changing” Raspberry Pi 2, Ian McAlpine, Issue 30, page 23) commented that author would be interested in exploring GPIO development using Visual Studio. The good news is that there is no need to wait for Windows 10, you can use Visual Studio to develop C++ applications which will run on the Raspberry Pi today.
Visual Studio
Microsoft have recently released an update to the free versions of Visual Studio. Previous releases required that developers download a different version of Visual Studio depending upon the development language and platform being used. The newer version, Microsoft Visual Studio Community 2013 removes this requirement and offers a single download an installer for a multitude of languages and environments.
Another key change is that Visual Studio Community 2013 supports the installation of add-ons. The previous Express editions did not allow this.
The Visual Studio Community 2013 system requirements are high (1.6 GHz processor, 1 GB RAM and 20 GB disc space) when compared to the Raspberry Pi but Visual Studio will be running on the PC where these resources are commonly available in modern PCs.
The first step is to download and install Microsoft Visual Studio Community 2013 on the PC. There is plenty of information on the Visual Studio web site and the process is simple and so I will not go into any further detail here.
VisualGDB
VisualGDB is where all of the magic happens. This add-on developed by SysProgs allows Visual Studio to be used with a wide variety of development boards and systems including the Raspberry Pi. The add-on is installed on the PC and this allows Visual Studio to communicate with the target platform. Supported platforms include:
- Raspberry Pi
- Beaglebone
- MSP430
- STM32
amongst others.
VisualGDB is not a free product but the developers do offer a 30-day free trial so you can evaluate the add-on for free. Installation of VisualGDB is as simple as the Visual Studio installation. Full instructions can be found on the downloads page and as such will not be covered here. The full product is not free but there are discounts available for educational users.
Compiling Options
VisualGDb offers two options for compiling your application:
- Native compilation
- Cross compilation
Native compilation allows the user to edit the source files in Visual Studio, save them on the Raspberry Pi and then invoke the compiler on the Raspberry Pi.
Cross compilation downloads a compiler onto your PC, this is all setup and configured for you. Your source files are edited on the PC and then the local compiler is used to generate the application executable. The compiled application is then copied to the Raspberry Pi for execution or debugging.
For small applications there are very few advantages in using a cross compiler but for a large application the advantages are obvious. Compiling applications is notoriously memory and processor intensive. Larger applications will therefore benefit from the greater resources available on the PC compared to those available on the Raspberry Pi.
Debugging
Visual Studio connects to the Raspberry Pi using the GDB. To the programmer this is transparent and the experience is much the same as when debugging Windows applications on the PC.
The VisualGDB web site contains a number of tutorials all of which are excellent and easy to follow. The first and most basic connects your development environment to the Raspberry Pi and simply outputs the name of the Raspberry Pi to the remote console:
#include <stdio.h>
#include <unistd.h>

using namespace std;

int main(int argc, char *argv[])
{
    char szHost[128];
    gethostname(szHost, sizeof(szHost));
    printf("The host name is %s\n", szHost);
    return 0;
}
The first tutorial uses the C compiler on the Raspberry Pi to do this. The tutorial encourages you to place breakpoints in the code and execute the application in debug mode.
Interface Changes
One thing to note is that VisualGDB adds a new Project Properties to the project right click menu. This menu item, VisualGDB Project Properties, can be seen at the top of the menu:
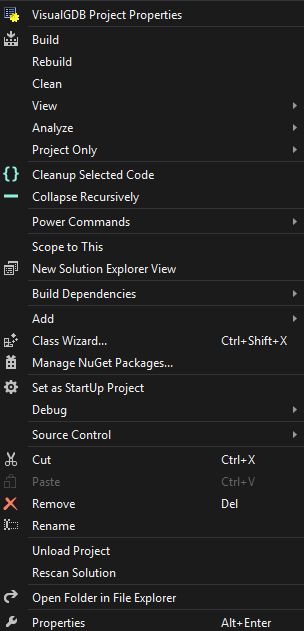
Visual Studio Project Properties Menu
Selecting this entry determines how your application is compiled and executed. It allows you to change the setting which were selected during the creation of the initial project and it’s connection to the Raspberry Pi.
Simple so far, no complex installation or configuration required. It just worked.
Talking to Hardware
There are a number of methods for accessing the GPIO pins on the Raspberry Pi. Each method has it’s own merits but for this experiment the priority will be speed. This will be achieved by using the Gert and Dom example from the elinux web site as a template.
Starting with the standard headers:
#include <stdio.h>
#include <stdlib.h>
#include <fcntl.h>
#include <sys/mman.h>
#include <unistd.h>
A small modification is required for the Raspberry Pi 2:
#ifdef RPiB2
    #define BCM2708_PERI_BASE        0x3F000000
#else
    #define BCM2708_PERI_BASE        0x20000000
#endif
From this point on the application follows much the same as that on the elinux web site.
//
//  GPIO Controller.
//
#define GPIO_BASE   (BCM2708_PERI_BASE + 0x200000)

#define PAGE_SIZE   (4 * 1024)
#define BLOCK_SIZE  (4 * 1024)

int  mem_fd;
void *gpio_map;

// I/O access
volatile unsigned *gpio;

// GPIO setup macros. Always use INP_GPIO(x) before using OUT_GPIO(x) or SET_GPIO_ALT(x,y)
#define INP_GPIO(g) *(gpio + ((g) / 10)) &= ~(7 << (((g) % 10) * 3))
#define OUT_GPIO(g) *(gpio + ((g) / 10)) |=  (1 << (((g) % 10) * 3))
#define SET_GPIO_ALT(g,a) *(gpio + (((g) / 10))) |= (((a) <= 3 ? (a) + 4 : (a) == 4 ? 3 : 2) << (((g) % 10) * 3))

#define GPIO_SET *(gpio + 7)  // sets   bits which are 1 ignores bits which are 0
#define GPIO_CLR *(gpio + 10) // clears bits which are 1 ignores bits which are 0

#define GET_GPIO(g) (*(gpio + 13) & (1 << g)) // 0 if LOW, (1<<g) if HIGH

#define GPIO_PULL *(gpio + 37) // Pull up/pull down
#define GPIO_PULLCLK0 *(gpio + 38) // Pull up/pull down clock

//
// Set up a memory regions to access GPIO
//
void setup_io()
{
    if ((mem_fd = open("/dev/mem", O_RDWR | O_SYNC)) < 0)
    {
        printf("can't open /dev/mem \n");
        exit(-1);
    }

    /* mmap GPIO */
    gpio_map = mmap(
        NULL,                   // Any adddress in our space will do
        BLOCK_SIZE,             // Map length
        PROT_READ | PROT_WRITE, // Enable reading & writting to mapped memory
        MAP_SHARED,             // Shared with other processes
        mem_fd,                 // File to map
        GPIO_BASE               // Offset to GPIO peripheral
        );

    close(mem_fd);              // No need to keep mem_fd open after mmap

    if (gpio_map == MAP_FAILED)
    {
        printf("mmap error %d\n", (int) gpio_map);  // errno also set!
        exit(-1);
    }

    // Always use volatile pointer!
    gpio = (volatile unsigned *) gpio_map;
}
The main application requires modification in order to repeatedly toggle the selected GPIO pin, in this case GPIO3.
int main(int argc, char **argv)
{
    // Set up gpio pointer for direct register access
    setup_io();

    // Set GPIO pin 3 to output
    INP_GPIO(3); // must use INP_GPIO before we can use OUT_GPIO
    OUT_GPIO(3);

    while (1)
    {
        GPIO_SET = 1 << 3;
        GPIO_CLR = 1 << 3;
    }

    return 0;
}
Running this application and connecting an oscilloscope generates a 41 MHz signal with approximately a 50% duty cycle.
Conclusion
Visual Studio is not the only option for developing applications on the Raspberry Pi, you can use a simple text editor on the Raspberry Pi or for something more sophisticated, you can set up Eclipse on the PC and connect to the Raspberry Pi using GDB. Both of these methods are free and have their own merits.
The text editor approach is basically already there on the Raspberry Pi as supplied. The disadvantage is that debugging is not integrated and can be difficult.
Eclipse is a free development environment but it can be difficult to setup although tutorials are available.
As we have seen, Visual Studio is free but requires VisualGDB to be installed and VisualGDB is not a free product although educational discounts are available. On the plus side, VisualGDB is simple to install and configure. It is also supplied with a set of project templates for the Raspberry Pi.