RSS

Posts Tagged ‘Electronics’

Arithmetic Logic Unit Chip Selection

Sunday, July 16th, 2017

In the previous post, a high level design for an Arithmetic Logic Unit (ALU) was presented. It is time to consider how this could be implemented.

7400 Series Integrated Circuits

The 7400 series of integrated circuits became a staple in computer design and digital electronics in the 1970s and 1980s. These packages implemented everything from simple logic gates (AND, OR, XOR, NOR etc.) through to complex functions such as Error Detection and Correction (see 742960). See this article for a comprehensive list of chips and their functions.

So popular were these chips that they are still available today in the original DIL (Dual In-line Package) as well as surface mount packages.

A number of variations of these ICs were produced:

Series Description
74 Standard TTL
74LS Low-power Schottky
74LAS Advanced Schottky
74ALS Advanced Low-power Schottky

The above list is not comprehensive and many more variations are available.

This series of posts will concentrate on using the LS series of chips where possible.

Internals of the ALU

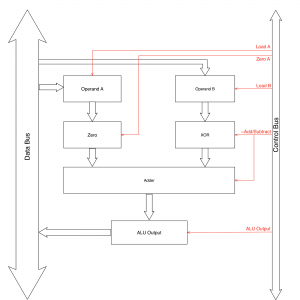
The ALU in the SSEM needs to support addition (for the JRP instruction) and subtraction (for the SUB and LDN instructions). The previous post presented the internal view of the ALU for the SSEM as:

ALU Internals

Internal view of an Arithmetic Logic Unit showing the control signals and data paths.

The ALU has five distinct components:

  1. Storage for the A and B operands (registers)
  2. Zero Unit
  3. XOR
  4. Adder
  5. ALU Output

Let’s look at how each of these could possibly be implemented using 74LS00 series integrated circuits.

Storage for the A and B operands (registers)

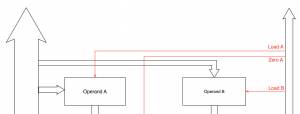
Both of the operands are connected to the data bus at the same time:

Operand A and B

Operand A and B

The Load control signal determines when the input signals should be stored in the register. Each of the registers holding the operand has an independent load signal. So for this part of the ALU a component is required that will:

  1. Take the value on the input pins and store the value
  2. Only load the data into the register when the trigger signal has a known value
  3. Present the stored value on the output pins

The above requirement fits the description of a Flip-Flop (also known as a Latch).

The 74LS00 series has a number of flip-flops and latches available. The 74LS373 contains an octal transparent latch with three state output. This chip is still commonly available and has the following properties:

  1. Input signals can be latched (stored) in the internal registers on request
  2. The output from the latch can be turned on or off, again, on request

The above functions are controlled by two signals:

  1. Clock
  2. Output Enable (~OE)

Clock

When the clock signal is low the inputs are effectively disconnected from the latches. the latches will therefore remain unchanged and hold the previously latched value.

A high clock signal will allow the input pins to the connected to the latches. Any changes on the inputs are presented to the latches. This holds true for as long as the clock signal is in the high state.

The state of the input pins is held in the latches when the clock signal transitions from high to low (on the falling edge of the clock).

Output Enable

The output enable pin is an active low pin (denoted here by the ~ symbol before the name of the pin). This means that the contents of the latches will be output from the chip when the ~OE pin is in the low state.

Putting the ~OE pin in a high state disconnects the latches from the output pins and puts the outputs in a high impedance (also known as a high-Z) state.

Setting ~OE low while the clock pin is high means that the outputs will follow the inputs. This happens because the high clock signal allows the inputs to be connected to the latches and the low output signal puts the value in the latches on to the output pins.

Loading the Latch

From the above description, the Clock pin should be connected to the Load A and Load B signals of the respective operands. This will allow the latch to be loaded with the input signals when the load signal falls from high to low.

The inputs to the chips should be connected to the data bus directly and simultaneously. Data cannot be loaded into the latch until the appropriate load signal transitions from high to low. The load signals will control when the operand changes as follows:

  • Load A (or Load B) signals are low then the inputs will have no impact on the operands. The outputs will reflect the previous value stored in the latch.
  • When Load A (or Load B) is high then the contents of the data bus will be presented to the respective latch. The output of the respective operand will reflect the current contents of the data bus.
  • When the Load A (or Load B) signal falls from high to low, the current contents of the data bus will be stored in the respective operand. The output will reflect this value no matter what happens on the data bus.

Aside: in 2013, the intention was to simulate the SSEM in VHDL. The 74HC373 was simulated in a series of posts around that time.

XOR

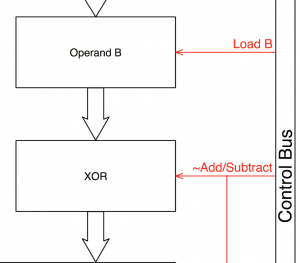
The next block available is the 74LS series is the XOR block:

Operand B and XOR

Operand B and XOR

This block performs one part of the negation process allowing the adder to also perform subtraction. The XOR truth table is:

~Add/Subtract Input Value Output
0 0 0
0 1 1
1 0 1
1 1 0

In twos complement, the first part of generating a negative number is to invert the bits in the original number. If you examine the above truth table, when the ~Add/Subtract signal is low, the output reflects the input value. When ~Add/Subtract is high then the output is the inverse of the input value.

~Add/Subtract Operation
0 Add
1 Subtract

So, setting the ~Add/Subtract signal high when the ALU is subtracting operand B from operand A and low when the ALU is adding operand A to operand B will ensure that the correct value is passed through to the adder.

The 74LS86 is a quad 2-input XOR gate (contains four 2-input XOR gates) in a single package. The necessary functionality is achieved by connecting the A inputs (not to be confused with the A operand) of each gate to the ~Add/Subtract signal. All of the A inputs are therefore connected together. The B inputs are connected to the outputs of the B operand latch.

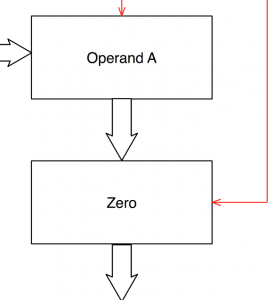
Zero

The zero unit sits between the output of the A operand and the Adder. Its function is to select between two possible input values:

  1. Zero
  2. A operand

and pass the selection on to the Adder.

Operand A and Zero

Operand A and Zero

A number of possibilities exist:

  • Use the ~OE signal on the A output to simply turn the output off when zero is required. This may require the use of pull down resistors to prevent a floating signal.
  • Use a buffer chip such as the 74LS245 to connect the Adder to ground when ~OE on the A operand goes high

A little investigation is required.

Adder

The adder unit takes the inputs and simply adds them together:

Adder with inputs.

Adder with inputs.

The 74LS283 is a four bit full adder with carry in and carry out. An 8-bit adder is created by chaining two four bit adders together:

In the case of subtraction, the final part of the negation of a twos complement number is to add 1 to the inverted bit pattern of the original number. Setting the carry in on the first adder effectively adds one to the number. The same ~Add/Subtract signal in the XOR block can be used here as it is low for addition (zero will be added to the sum) and high for subtraction (one will be added to the sum).

ALU Output

The ALU output takes the output of the adder and makes this available to the data bus:

ALU Output

ALU Output

Output to the data bus is controlled by the ALUOutout signal and this function can be performed by a buffer circuit. The 74LS245 is an octal bus transceiver with non-inverting three state outputs. The direction of signal transmission can be controlled using the DIR pin on this chip. In the case of the ALU, the direction is always from the ALU to the data bus and so this pin can be held high (or low) permanently.

Output from 74LS245 is controlled by the ~OE pin. This is an active low pin and the chip is transparent when the signal is low and in high impedance mode when this pin is held high.

Conclusion

All of the integrated circuits for the high level functionality of the ALU have been identified. The next step is to put this together and see if it works as expected.

Something for the next article.

Arithmetic Logic Unit

Monday, June 26th, 2017

The February post regarding the SSEM presented a software implementation of the core hardware:

  • Program counter a.k.a Current Instruction (CI)
  • Arithmetic Logic Unit (ALU)
  • Instruction register a.k.a Present Instruction (PI)
  • Registers (memory)

So, how easy this would be to implement the ALU in 1970s hardware, namely, 74LS series of chips.

Arithmetic Logic Unit

The only explicit arithmetic operation implemented by the ALU is the SUB instruction. There is however, one other operation that requires an arithmetic operation to be performed, the JRP instruction. This instruction adds the contents of a store line to CI and stores the result in CI. The inclusion of an ADD instruction to the ALU instruction set will support the JRP instruction.

Before we progress further it is worth noting that the SSEM uses twos complement representation to store numbers.

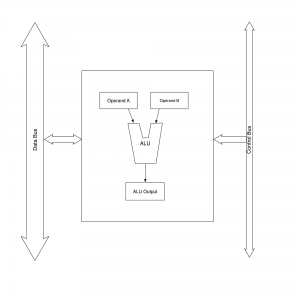
The high level view of the ALU and the way in which it interacts with the other components can be viewed as follows:

High level view of an Arithmetic Logic Unit.

High level view of an Arithmetic Logic Unit.

Two busses run through this CPU:

  1. Data Bus
  2. Control Bus

The Data Bus is used to move data from one part of the CPU to another. This is also connected to the external data bus of the computer allowing the CPU to store and retrieve data from system peripherals and memory.

The Control Bus determines which operations are performed by the CPU (in this particular case, by the ALU) at any point in time.

The ALU uses two input operands (A and B) from the Data Bus. Operations are performed on the two operands, the type of operation is determined by the signals on the Control Bus. The results of the operation are then placed in the ALU Output register. The final step is to make this result available to the Data Bus.

The fact that the SSEM implements only these two arithmetic instructions operating on twos complement numbers leads to a very simple ALU design with very few control signals.

Data Bus

As noted, the data bus moves data around the system. The ALU requires two operands for the ADD or SUB operations. These can be implemented in a single operation or in several stages.

Single Operation

Supplying the data in a single operation would require the data bus to be twice as wide as the word size. In the case of the SSEM this would require a data bus that is 64-bits wide. Operand A would be supplied by one half of the signals on the data bus. Operand B would be supplied by the signals on the other half of the bus.

Multiple Steps

Supplying each operand independently would require a two step process, the first step puts operand A on the data bus and loads into the operand A register. The second step puts operand B on the data bus and loads the data into the operand B register. This is slower, taking two steps, but simplifies the hardware design as a 32-bit data bus is used.

Control Bus

The operation of the CPU is orchestrated by the signals present on the control bus. In the case of the instructions being implemented (ADD and SUB) using two registers the following signals are required:

  1. Load operand A (place the contents on the data bus into operand A)
  2. Load operand B (place the contents on the data bus into operand B)
  3. Output result (place the ALU result onto the data bus)
  4. Add or subtract (Select either addition or subtraction)

There is another instruction that would benefit from having access to the ALU, namely, Load Negative (LDN). This instruction loads a negative number into the accumulator. A negated number can be obtained by subtracting the original number (from a store line) from 0.

If we design the system so that the subtrahend (the number to be subtracted) is always placed in the B operand and operand A can be zero then we can support the LDN instruction. This leads to the final signal, Operand A or Zero.

The full list becomes:

  1. Load operand A (place the contents on the data bus into operand A)
  2. Load operand B (place the contents on the data bus into operand B)
  3. Output result (place the ALU result onto the data bus)
  4. Add or subtract (Select either addition or subtraction)
  5. Operand A or Zero

Inside the ALU

If we add the data paths and control signals to the above diagram we have the following:

ALU Internals

Internal view of an Arithmetic Logic Unit showing the control signals and data paths.

The data paths are shown as broad arrows. The control signals are drawn in red.

Loading the Operand Registers

The data from the data bus is presented to both the A and the B operands at the same time. The data is loaded into the register when the appropriate Load A or Load B signal is set.

Zero Operation

The zero operation is only needed for the A operand. This block will either pass the value in operand A through to the adder (for the SUB, ADD and JRP instruction) or pass 0 through to the adder (for the LDN instruction).

XOR

The XOR block is used to help with the negation of the number in the B operand. In twos complement, a negative number is obtained by inverting the bits in the original number and the adding 1. The XOR helps with the inversion process. Consider the truth table for the XOR operator:

Control Signal Input Value Output
0 0 0
0 1 1
1 0 1
1 1 0

Note that when the Control Signal is 0 then the output from the XOR gate reflects the value on the Input Value. When the Control Signal is 1 then the output is the inverse of the Input Value.

This provides a method for solving the first part of the problem of generating the twos complement negative number, namely, inverting all of the bits in the positive number.

Adder

The adder does exactly what it’s name suggests, it adds two numbers together. Normally, these units have a carry in and a carry out signal to allow multiple units to be chained together:

Two chained four bit adders.

Two chained four bit adders.

When the ~Add/Subtract control signal is set to 0 then the XOR block passes through operand B unchanged. The carry in signal to the first of the adders (Adder-0) is set to 0. The result is that operand A and operand B are added together. This supports the JRP instruction which requires an addition.

When the ~Add/Subtract control signal is set to 1 then the XOR block inverts the bits in operand B. The additional 1 needed for the twos complement process is provided by passing the ~Add/Subtract control signal to the carry in input to the first adder unit (Adder-0 in the above diagram).

Result Output

The final part of the problem is to control when the result from the calculation is output on to the data bus.

Conclusion

A lot of theory, next step is to consider how this can be put into practice.

Something for the next article.

Design the System

Friday, April 14th, 2017

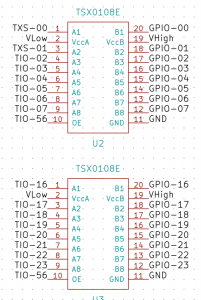
One of the current projects on the go is a level shifter for the Teensy 3.6 using the TXS0108E chip. The aim is to allow the use of as many of the Teensy’s GPIO pins as possible to allow the development of another project that is working on 5V logic levels.

This project reminded me that when putting together a microcontroller project that the system is made up of both hardware and software. Sometimes a design decision made in one element can have an adverse effect on the other.

Design Decisions

From the start it was decided that the GPIO pins would have a one to one mapping from the microcontroller to the external bus. So pin 1 on the microcontroller would map to pin 1 on the external connectors.

This would make coding easy when using the Arduino API. So connecting to the external bus and outputting a digital high signal on pin 1 would become:

pinMode(1, OUTPUT);
digitalWrite(1, HIGH);

Impact

Putting the circuit together in KiCAD resulted in the following design:

PCB Layout

PCB Layout

TXS0108E Schematic

TXS0108E Schematic

As you can see, the Teensy GPIOS (TIO-1…) mapped directly to the external bus (GPIO-1…)

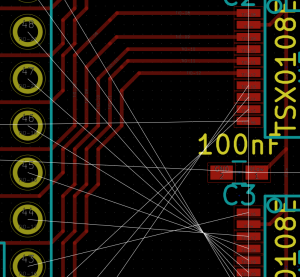
When translated into the rats nest there were three occurrences of the following:

PCB Layout

PCB Layout

Routing this was going to be a nightmare.

Changing the Design

At this point the penny dropped that a small change in the software would make the routing a whole lot easier.

Instead of using the pin numbers directly, a #define could be used for the external bus pin numbers. The above snippet would become:

#define BUS_IO1    30
.
.
.
pinMode(BUS_IO1, OUTPUT);
digitalWrite(BUS_IO1, HIGH);

This small change to the design created a one off task to create a header file for the board but it made the routing a lot easier.

Conclusion

Sometimes a small change may create a new task (creating the header file) but may possibly save more time elsewhere in the project.

Moral of the story, Design the system as a whole, not the individual components.

March Musings

Friday, March 31st, 2017

March has been a funny old month. The launch of the Raspbery Pi Zero W was an interesting event. Most of February was spent evaluating the direction of future developments. The launch of the Pi Zero W in early March influenced those decisions.

It feels like nothing was really completed but the foundations for the next few months have been set. Here’s a few of the things March has bought our way:

  • Release of the Raspberry Pi Zero W
  • Moving from MicroPython on the ESP32 to Python on the Pi
  • TXS0108E level shifting IC
  • PlatformIO
  • Teensy 3.6

Python

More precisely, MicroPython. The increasing number of platforms supporting MicroPython has made this an interesting development environment. In theory the code developed on one microcontroller supporting MicroPython should be portable to other microcontrollers with relative ease.

The Raspberry Pi Zero W changed all of that.

There were several microcontrollers running MicroPython at the start of February, the ESP8266 was common and cheaply available. A beta version of MicroPython became available for the more capable ESP32 around the same time.

The arrival of the Zero W means that the full Python language is available on a development board running 5-20 times faster than an equivalent microcontroller development board. All this with the added bonus of WiFi and SD card built in.

Another attractive feature of the Zero W is the cost in the UK. The most powerful microcontroller boards available in the UK cost between 1.5-2 times that of the Zero W including shipping.

The net result, I’m starting to look at the Pi Zero W as a possible go to board for future projects.

Level Shifting

One recent project requires the use of 5V logic, a problem when current microcontroller boards are using 3.3V logic levels. Some are 5V tolerant, but not all. Ideally the microcontroller I am after should allow for 40+ GPIO pins. The only microcontroller in the arsenal with this number of pins is the Teensy 3.6. Sadly this in only tolerant to 3.3V signals. Interestingly, I found a reasonably priced bidirectional level shifter, the TXS0108E, so some experimenting required to see if I can use this part. The aim is to use the Teensy to inject test signals.

Time to break out the breadboards and KiCAD.

PlatformIO

I have had PlatformIO installed on the laptop since I first came across it last year. For most of that time it was being used as a simple text editor. What I never appreciated was the ability to program a number of development boards, a large number of development boards.

Time to uninstall the Arduino IDE on the Mac.

A current project requires some memory, only a small amount, something suited to the 2114 4096-bit memory IC. A quick eBay search results in 20 ICs in the post. Only problem now is to make sure I understand how they work and test the batch of chip. Enter the Arduino Uno and PlatformIO.

Teensy 3.6

As noted, one current project requires a large number of IOs, something the Teensy 3.6 can bring. A quick package update installs the Teensy 3.6 board into the PlatformIO environment.

Time to write and deploy a quick test application, enter Blinky… No luck. PlatformIO uses the teensy_loader_cli application to deploy the hex file to the Teensy board. The default package deployed with PlatformIO did not upload the binary file to the Teensy. the solution was to build a new version of the teensy_loader_cli application and overwrite the one supplied with PlatformIO. Success!

For those who are interested, the solution is:

  • Download the source code from GitHub
  • Edit the Makefile
  • Change the OS version to MacOS
  • Uncomment the line USE_LIBUSB ?= YES
  • Rebuild the application
  • Copy the new version of the application to the tools directory, in my case this was ~/.platformio/packages/tool-teensy

Conclusion

It seems that nothing much was completed but the work set the stage for future developments.

Manchester Baby (SSEM) Emulator

Sunday, February 12th, 2017

The Manchester Small Scale Experimental Machine (SSEM) or Manchester Baby as it became known, was the first computer capable of executing a stored program. The Baby was meant as a proving ground for the early computer technology having only 32 words of memory and a small instruction set.

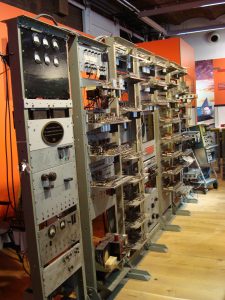
A replica of the original Manchester Baby is currently on show in the Museum of Science and Industry in Castlefield, Manchester.

Manchester Baby at MOSI

Manchester Baby at Museum of Science and Industry August 2012.

As you can see, it is a large machine weighing in at over 1 ton (that’s imperial, not metric, hence the spelling).

Manchester Baby Architecture

A full breakdown on the Manchester Baby’s architecture can be found in the Wikipedia article above as well as several PDFs, all of which can be found online. The following is meant as a brief overview to present some background to the Python code that will be discussed later.

Storage Lines

Baby used 32-bit words with numbers represented in twos complement form. The words were stored in store lines with the least significant bit (LSB) first (to the left of the word). This is the reverse of most modern computer architectures where the LSB is held in the right most position.

The storage lines are equivalent to memory in modern computers. Each storage line contains a 32-bit value and the value could represent an instruction or data. When used as an instruction, the storage line is interpreted as follows:

Bits Description
0-5 Storage line number to be operated on
6-12 Not used
13-15 Opcode
16-31 Not used

As already noted, when the storage line is interpreted as data then the storage line contains a 32-bit number stored in twos complement form with the LSB to the left and the most significant bit (MSB) to the right.

This mixing of data and program in the same memory is known as von Neumann architecture named after John von Neumann. For those who are interested, the memory architecture where program and data are stored in separate storage areas is known as a Harvard architecture.

SSEM Instruction Set

Baby used three bits for the instruction opcode, bits 13, 14 and 15 in each 32 bit word. This gave a maximum of 8 possible instructions. In fact, only seven were implemented.

Binary Code Mnemonic Description
000 JMP S Jump to the address obtained from memory address S (absolute jump)
100 JRP S Add the value in store line S to the program counter (relative jump)
010 LDN S Load the accumulator with the negated value in store line S
110 STO S Store the accumulator into store line S
001 or 101 SUB S Subtract the contents of store line S from the accumulator
011 CMP If the accumulator is negative then add 1 to the program counter (i.e. skip the next instruction)
111 STOP Stop the program

When reading the above table it is important to remember that the LSB is to the left.

Registers

Baby had three storage areas within the CPU:

  1. Current Instruction (CI)
  2. Present Instruction (PI)
  3. Accumulator

The current instruction is the modern day equivalent of the program counter. This contains the address of the instruction currently executing. CI is incremented before the instruction is fetched from memory. At startup, CI is loaded with the value 0. This means that the first instruction fetched from memory for execution is the instruction in storage line 1.

The present instruction (PI) is the actual instruction that is currently being executed.

As with modern architecture, the accumulator is used as a working store containing the results of any calculations.

Python Emulator

A small Python application has been developed in order to verify my understanding of the architecture of the Manchester Baby. The application is a console application with the following brief:

  1. Read a program from a file and setup the store lines
  2. Display the store lines and registers before the program starts
  3. Execute the program displaying the instructions as they are executed
  4. Display the store lines and registers at the end of the program run

The application was broken down into four distinct parts:

  1. Register.py – implement a class containing a value in a register or storage line
  2. StoreLines.py – Number of store lines containing the application and data
  3. CPU.py – Implement the logic of the CPU
  4. ManchesterBaby.py – Main program logic, reading a program from file and executing the program

The source code for the above along with several samples and test programs can be fount on Github.

Register.py

A register is defined as a 32-bit value. The Register class stores the value and has some logic for checking that the value passed does not exceed the value permitted for a 32-bit value. Note that no other checks or interpretation of the value is made.

StoreLines.py

StoreLines holds a number of Registers, the default when created is 32 registers as this maps on to the number of store lines in the original Manchester Baby. It is possible to have a larger number of store lines.

CPU.py

The CPU class executes the application held in the store lines. It is also responsible for displaying the state of the CPU and the instructions being executed.

ManchesterBaby.py

The main program file contains an assembler (a very primitive one with little error checking) for the Baby’s instruction set. It allows a file to be read and the store lines setup and finally instructs the CPU to execute the program.

SSEM Assembler Files

The assembler provided in the ManchesterBaby.py file is primitive and provides little error checking. It is still useful for loading applications into the store lines ready for execution. The file format is best explained by examining a sample file:

--
--  Test the Load and subtract functions.
--
--  At the end of the program execution the accumulator should hold the value 15.
--
00: NUM 0
01: LDN 20      -- Load accumulator with the contents of line 20 (-A)
02: SUB 21      -- Subtract the contents of line 21 from the accumulator (-A - B)
03: STO 22      -- Store the result in line 22
04: LDN 22      -- Load accumulator (negated) with line 22 (-1 * (-A - B))
05: STOP        -- End of the program.
20: NUM 10      -- A
21: NUM 5       -- B
22: NUM 0       -- Result

Two minus signs indicate an inline comment. Everything following is ignored.

An instruction line has the following form:

Store line number: Instruction Operand

The store line number is the location in the Store that will be used hold the instruction or data.

Instruction is the mnemonic for the instruction. The some of the instructions have synonyms:

Mnemonic Synonyms
JRP JPR, JMR
CMP SKN
STOP HLT, STP

As well as instructions a number may also be given using the NUM mnemonic.

All of the mnemonics requiring a store number (all except STOP and CMP) read the Operand field as the store line number. The NUM mnemonic stores the Operand in the store line as is.

Testing

Testing the application was going to be tricky without a reference. Part of the reason for developing the Python implementation was to check my understanding of the operation of the SSEM. Luckily, David Sharp has developed an emulator written in Java. I can use this to check the results of the Python code.

The original test program run on the Manchester Baby was a calculation of factors. This was used as it would stress the machine. This same application can be found in several online samples and will be used as the test application. The program is as follows:

--
--  Tom Kilburns Highest Common Factor for 989
--
01:   LDN 18
02:   LDN 19
03:   SUB 20
04:   CMP
05:   JRP 21
06:   SUB 22
07:   STO 24
08:   LDN 22
09:   SUB 23
10:   STO 20
11:   LDN 20
12:   STO 22
13:   LDN 24
14:   CMP
15:   JMP 25
16:   JMP 18
17:   STOP
18:   NUM 0
19:   NUM -989
20:   NUM 988
21:   NUM -3
22:   NUM -988
23:   NUM 1
24:   NUM 0
25:   NUM 16

Running on the Java Emulator

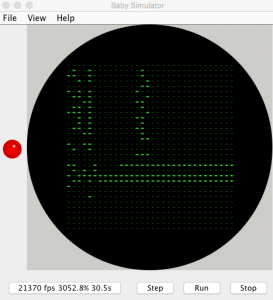
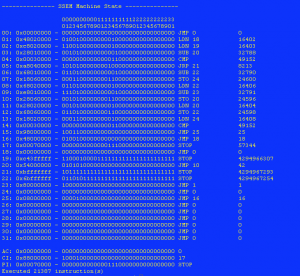
Executing the above code in David Sharps emulator gives the following output on the storage tube:

Java Simulator Storage Lines

Result of the HCF application shown on the storage lines of the Java emulator.

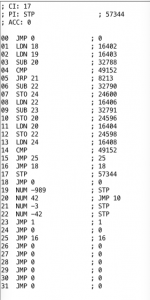
and disassembler view:

Storage Lines Disassembled

Result of the program execution disassembled in the Java emulator.

And running on the Python version of the emulator results in the following output in the console:

Python Output

Final output from the Python emulator.

Examination of the output shows that the applications have resulted in the same output. Note that the slight variation in the final output of the Python code is due to the way in which numbers are extracted from the registers. Examination of the bit patterns in the store lines shows that the Java and Python emulators have resulted in the same values.

Conclusion

The Baby presented an ideal way to start to examine computer architecture due to its prmitive nature. The small storage space and simple instruction set allowed emulation in only a few lines of code.

Soak Testing (Minor Update)

Saturday, October 15th, 2016

The weather station project has been struggling for part of September with a random exception in my code. The source of the exception was finally identified although the exact cause is still a mystery. As a temporary measure, the component and the associated source code were removed from the project, this allowed the project to continue.

Source of the Exception

In the previous post, Define a Minimum Viable Product and Ship it, I discussed a replacement for the clock module. This module was changed from the DS3234 to the DS3231 freeing up four additional pins (the DS3231 is an I2C peripheral and the DS3234 uses SPI). This change seems to have introduced some instability into the system.

Several days debugging followed after which I was still unable to isolate the problem. The interim solution is to remove the module and use the Ticker class to trigger an interrupt. Not ideal but this will allow the rest of the software to be soak tested.

The additional Ticker object fires once per minute to trigger the reading of the sensors. In addition, the interrupt will check the current time and if the hour and minute are both zero then the application will reset the pluviometer counter.

Soak Testing

As mentioned above, one Ticker object is generating an interrupt once per minute. The frequency of the interrupt is higher than will be used in the final project. One minute is more than enough time to perform the sensor readings and log this to the internet but also frequent enough to simulate a prolonged period in the field.

The prototype board was also located close to the final home for the sensors. This hit a problem as the range of the WiFi network was not sufficient for the ESP8266. This problem has prevented the prototype to be tested in the field at the moment.

Conclusion

The prototype board is currently sited on a window ledge in the house. taking temperature, humidity and luminosity readings once per minute. This data is logged to the Sparkfun Phant Data Service. The system has been running continuously for the last 7 days (approximately 10,000 readings).

The software seems stable at the moment, the next problem, extend the range of the WiFi network.

Define a Minimum Viable Product and Ship it

Monday, September 5th, 2016

The last few weeks have seen me fighting a communication problem between the Oak and the STM8S. As a result the development has slowed down a little to the point that the project was becoming frustrating. It was about two weeks ago that I was listening to a podcast and the presenter made a very pertinent comment. Some software start-ups fail because they fail to define the minimum viable product. This gives them nothing to aim for and most importantly no firm idea of what they have to deliver.

This felt very relevant as the weather station was stalling. With this in mind I decided to break the project up into a number of revisions.

Revision One – Basic Sensing

Although this revision is titled Basic Sensing, we will aim to get as many of the sensors working with the Oak, and only the Oak, as possible.

The Oak has an ESP8266 (ESP12) at it heart and this leaves a restricted number of IO pins available to communicate with the outside world. With this in mind it should still be possible to work with the following sensors:

  1. Wind speed and direction
  2. Pluviometer
  3. BME280 (air temperature, humidity and temperature)
  4. DS18B20 (ground temperature
  5. TSL2561 (luminosity)

An additional pin is also required to allow the Real Time Clock (RTC) module to generate and interrupt to let the Oak know it is time to take a reading.

One of the aims of the final system is to be able to run using solar power and batteries, however, for the initial version of the system this is not necessary. The main controller board can be placed inside to run on mains power with the rain and wind sensors outside. Some of the sensors would be inside so this would not give a good view of the weather but will allow testing of the software.

Clock Module Change

I came across a variant of the DS3234 RTC on one of my usual suppliers web page. The DS3231 module is similar to the DS3234 with four differences:

  1. Price – I can buy four of the DS3231 modules for the same price as one DS3234
  2. Interface – the DS3231 uses I2C rather than SPI
  3. No on chip memory for the DS3231
  4. Additional EEPROM on board

All of the main features that make the DS3234 desirable are also present in the DS3231. The major piece of work is the necessity to overhaul the DS3234 library created previously.

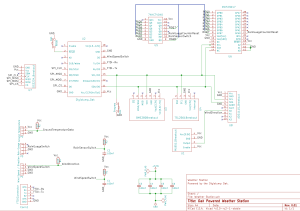
Schematic

The main changes to the hardware design involve moving the connections to the various sensors from the STM8S to the Oak. This has been made possible by the change in the clock module from the DS3234 (SPI) to the DS3231 (I2C). This freed up the four pins that had been dedicated to the SPI interface.

The updated schematic is as follows:

Weather Station Rev1 Schematic

Weather Station Rev1 Schematic

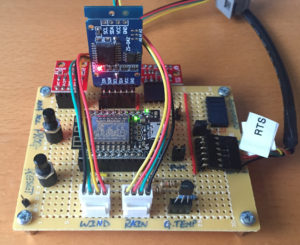
Translating this to hardware on a protoboard:

Weather Station Rev1 Protoboard

Weather Station Rev1 Protoboard

There are a couple of items on the hardware implementation that are not on the schematic:

  • Additional connectors / jumpers
  • Connector for OpenLog board

These items may or may not make it onto the final board and have been added to aid debugging.

Software

The software for this project has been placed on Github and is broadly speaking the same as previous versions in terms of design. The following are the most significant changes:

  1. STM8S code has been left in the project for the moment but this is not used in this initial working version.
  2. Interrupts for the pluviometer and the wind speed are now in the Oak code
  3. Logging to Phant has been implemented (public stream can be found
  4. DS3234 code has been abstracted and used to make a DS323x generic timer class and a DS3231 specific class

There are still some modifications required:

  1. Remove or convert to MQTT rather than Phant
  2. Look at exception handling
  3. Deal with network connection issues
  4. Clear the rainfall today counter when moving from one day to the next

One of the previous versions of this application used Adafruit’s MQTT library to connect to Adafruit.IO. Recent changes to the site and to the library means that any attempt to connect the Oak to Adafruit results in an exception being thrown. A task for later is to correct this problem if possible.

An Internet connection may not always be possible so it would be desirable to collect data while offline and then upload this later. This may be facilitated by the EEPROM on the DS3231 breakout board.

The software is currently throwing an exception every 10-30 readings. This results in the Oak resetting itself so it does recover although there is a small gap in the data gathering. The source code has been reviewed an there are no obvious memory leaks or null references. This problem is being deferred as there is a workable solution in that the Oak does reset itself. Not satisfactory in the long term but liveable for now.

Conclusion

The definition of a minimum product has allowed the project to proceed to the point where something can be deployed and tested. There are still a number of items to be completed before the original aims can be realised including the resolution of some issues in the minimum product.

One thing I have learned along the way, don’t try and use pin 10 as an interrupt pin on the Oak as this is not implemented.

The next steps, complete the initial code and deploy the external sensors.

Adding Another Micrcontroller

Saturday, July 9th, 2016

Last time the prototype was moved from breadboard to perfboard. The schematic had a couple of components for the rain gauge and one additional ADC to compensate for the fact that the ESP8266 only has one ADC on board. These three components added a reasonable cost to the board and it was hinted that another microcontroller maybe added to the system to replace these components.

Enter the STM8S.

Hardware Modifications

The previous schematic looked as follows:

Weather Station Schematic

Weather Station Schematic

Three components are being targeted for replacement:

  1. 74HC4040 – counter
  2. MCP23017 – I2C output expander
  3. ADS1115 – 4 channel ADC

These components come to several pounds (dollars) worth of components. It may be possible to replace these with the STM8S and a little software.

ESP8266 Low Power Mode

A long term goal of the project is to reduce the power consumed by the system in order to allow the system to work from a battery / solar energy source. In order to work towards this goal the system should be looking to shut off as much of the system as possible when they are not needed.

Initial thoughts are that the system should collect data every 5 minutes. This means that most of the system is only required for a few seconds (say 10 seconds) every five minutes.

One exception is the rain gauge. This needs to be counting all day, every day as a sample taken at a point in time is not representative of the rain fall for a full day.

Another exception is the Real Time Clock (RTC). This needs to be running all of the time for two reasons, firstly it keeps track of the current date and time. Secondly, the system can generate an interrupt to wake the system on a regular basis.

Adding Another Microcontroller

Regular readers will no doubt be aware that I have been a regular user of the STM8S. This microcontroller is available in packages starting at around £0.72 (about $1). Even the smallest packages have several ADCs and multiple digital input / outputs potentially reducing the system costs.

One other area that a microcontroller can help is with the chosen RTC, the DS3234. This RTC can generate an interrupt when an alarm time is reached. The interrupt generated is a simple high to low transition. The ESP8266 however requires a pulse. The STM8S can help by providing this conversion, detecting the falling edge and generating a pulse for the ESP8266.

Sounds perfect.

Updated Schematic

Several previous posts have shown that it is possible to perform analog conversions and also capture interrupts. This makes it possible for the STM8S to gather several sensor readings for the Oak and replace some components, namely:

  1. ADS1115 4 channel ADC – The STM8S has several ADC channels and the system only requires 2 so far
  2. MCP23017 I2C Port Expander – Several digital channels remain available even after using some pins for the ADC
  3. 74HC4040 Counter – This functionality can be provided through software and a digital channel

Another attractive feature of this microcontroller is the ability to act as an I2C slave device. This will work well with the other digital sensors as they all use the I2C protocol, one protocol to rule them all.

A few changes to the schematic results in the following:

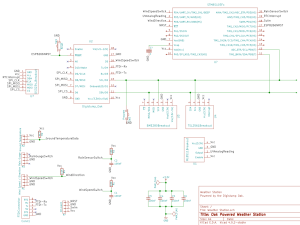
Weather Station Schematic Revision 0.01

Weather Station Schematic Revision 0.01

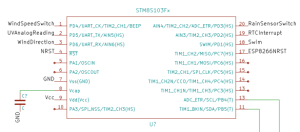
Focusing in on the STM8S:

STM8S On The Weather Station

STM8S On The Weather Station

The STM8S should be able to take over the reading values from the following sensors:

  1. Ultraviolet light
  2. Wind direction
  3. Wind speed
  4. Rain Gauge

All that is needed now is some software. Time to break out the compilers.

Conclusion

Adding a new microcontroller adds some complexity to the software development whilst reducing the cost of the final solution.

Next steps:

  • Putting the Oak to sleep and using the RTC to determine when to wake the Oak
  • Reading the sensors on the STM8S
  • Communication between the Oak and the STM8S over I2C

Weather Station Update (5 June 2016)

Sunday, June 5th, 2016

The proof of concept for the weather station is progressing well but the breadboard is a little fragile:

Breadboard Weather Station

Breadboard Weather Station

Time to move on to the next stage, protoboard.

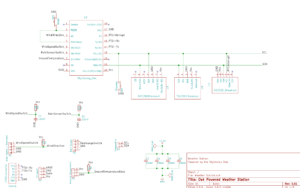
Quick schematic courtesy of KiCAD:

Weather Station Schematic

Weather Station Schematic

One thing to note in the schematic is that the project is rapidly using up the limited number of pins on the Oak. On with the protoboard, five hours of soldering later:

Protoboard Weather Station

Protoboard Weather Station

The project is already using an output expander to read the rain gauge. It might be time to think about the expansion options. To this end, the bottom right corner of the protoboard has space to experiment with a second microcontroller. It may be possible to replace the output expander and the additional ADC board with a cheaper option.

Conclusion

Putting the project in a more permanent state is a step forward. There are still some unanswered questions such as the use of the ADC or a second microcontroller but progress is being made.

DS3234 Real Time Clock

Wednesday, June 1st, 2016

One of the long term aims of the weather station is to take the system off grid. This will mean using an alternative energy source, something other than mains electricity. This usually means using solar energy to charge batteries in order to keep the system running.

Another scenario that will need to be considered is the case where the weather station is collecting data but is unable to connect to the internet. In this case it is desirable for the weather station to continue to collect data, record the date and time the observation was made and also store the readings. The system can then upload the data when the network connection is once available once more.

This article presents a possible solution to one problem and a possible solution to another:

  1. Reducing power by putting the system to sleep
  2. Recording the date / time when the system is not connected to the Internet

The solution being considered is a Real Time Clock (RTC) module based upon the DS3234 chip.

DS3234 RTC

The DS3234 is a real time clock module with a built in temperature controlled oscillator. It is a relatively self-contained module requiring few external components. The chip is programmed over the built in SPI interface.

A summary of the important features being considered are:

  1. Built in alarm(s)
  2. Battery back up
  3. Built in oscillator
  4. Interrupt on alarm

One additional feature that may be useful is the provision of 256 bytes of battery backed up RAM.

The interrupt generated by the alarms can be used to trigger the Oak to take action. In this way it may be possible for the Oak to sleep for a period of time waiting for a signal from the RTC. The RTC will run in much lower power mode than the Oak.

One disadvantage of this module, at the time of writing, was the lack of code that would either provide the functioality required or work reliably on the Oak.

Time to break out the C++ compiler.

Controlling the DS3234

Before we look at the software, it is worth spending a little time to review how the DS3234 is controlled. The RTC chip uses write operations to a series of registers in order to control the functionality of the chip. The register map is as follows:

Register Read AddressContents
0x00Current time seconds
0x01Current time minutes
0x02Current time hour
0x03Current time day
0x04Current time date
0x05Current time month
0x06Current time year
0x07Alarm 1 seconds
0x08Alarm 1 minutes
0x09Alarm 1 hour
0x0aAlarm 1 day/date
0x0bAlarm 2 minutes
0x0cAlarm 2 hour
0x0dAlarm 2 day/date
0x0eControl register
0x0fControl / status register
0x10Crystal aging offset
0x11Temperature (MSB)
0x12Temperature (LSB)
0x13Disable temperature conversions
0x14Reserved
0x15Reserved
0x16Reserved
0x17Reserved
0x18SRAM address
0x19SRAM data

Applications can write to the registers by setting bit 7 (i.e. add 0x80) in the address.

The register address is automatically incremented after a read or write operation. So to write the current time into the hours, minutes and seconds registers an application would simply write four bytes to the SPI bus; namely address 0x80 (write address for the seconds register) followed by the seconds, minutes and hour values.

The bit fields for the above registers are well defined in the DS3234 datasheet and are not covered in too much detail here and you are encouraged to download the datasheet for reference.

DS3234 Software – Private Interface

The full source code for this module can be downloaded from at the end of this article, the discussion about the software and it’s functionality will concentrate on the class definition in the header file. Those interested in the detail can jump into the source code at the end of the article.

So let’s have a look at the full header file:

#ifndef _DS3234_h
#define _DS3234_h

#include <BitBang\BitBang.h>

#if defined(ARDUINO) && ARDUINO >= 100
	#include "arduino.h"
#else
	#include "WProgram.h"
#endif

#define MAX_BUFFER_SIZE     256

//
//  Time structure.
//
struct ts
{
    uint8_t seconds;    // Number of seconds, 0-59
    uint8_t minutes;    // Number of minutes, 0-59
    uint8_t hour;       // Number of hours, 0-23
    uint8_t day;        // Day of the month, 1-31
    uint8_t month;      // Month of the year, 1-12
    uint16_t year;      // Year >= 1900
    uint8_t wday;       // Day of the week, 1-7
};

//
//  Define the methods required to communicate with the DS3234 Real Tiem Clock.
//
class DS3234RealTimeClock
{
    public:
        //
        //  Enums.
        //
        enum Alarm { Alarm1, Alarm2, Both, Unknown };
        enum AlarmType { OncePerSecond, WhenSecondsMatch, WhenMinutesSecondsMatch,  // Alarm 1 options.
                         WhenHoursMinutesSecondsMatch, WhenDateHoursMinutesSecondsMatch, WhenDayHoursMinutesSecondsMatch,
                         OncePerMinute, WhenMinutesMatch, WhenHoursMinutesMatch,    // Alarm 2 options.
                         WhenDateHoursMinutesMatch, WhenDayHoursMinutesMatch };
        enum ControlRegisterBits { A1IE = 0x01, A2IE = 0x02, INTCON = 0x04, RS1 = 0x08, RS2 = 0x10, Conv = 0x20, BBSQW = 0x40, NotEOSC = 0x80 };
        enum StatusRegisterBits { A1F = 0x02, A2F = 0x02, BSY = 0x04, EN32Khz = 0x08, Crate0 = 0x10, Crate1 = 0x20, BB32kHz = 0x40, OSF = 0x80 };
        enum RateSelect { OneHz = 0, OnekHz = 1, FourkHz = 2, EightkHz = 3 };
        enum Registers { ReadAlarm1 = 0x07, WriteAlarm1 = 0x87,
                         ReadAlarm2 = 0x0b, WriteAlarm2 = 0x8b,
                         ReadControl = 0x0e, WriteControl = 0x8e,
                         ReadControlStatus = 0x0f, WriteControlStatus = 0x8f,
                         ReadAgingOffset = 0x10, WriteAgingOffset = 0x90, 
                         ReadSRAMAddress = 0x18, WriteSRAMAddress = 0x98,
                         ReadSRAMData = 0x19, WriteSRAMData = 0x99 };
        enum DayOfWeek { Sunday = 1, Monday, Tuesday, Wednesday, Thursday, Friday, Saturday };
        //
        //  Construction and destruction.
        //
        DS3234RealTimeClock(const uint8_t);
        DS3234RealTimeClock(const uint8_t, const uint8_t, const uint8_t, const uint8_t);
        ~DS3234RealTimeClock();
        //
        //  Methods.
        //
        uint8_t GetAgingOffset();
        void SetAgingOffset(uint8_t);
        float GetTemperature();
        uint8_t GetControlStatusRegister();
        void SetControlStatusRegister(uint8_t);
        uint8_t GetControlRegister();
        void SetControlRegister(uint8_t);
        ts *GetDateTime();
        Alarm WhichAlarm();
        void SetDateTime(ts *);
        String DateTimeString(ts *);
        void SetAlarm(Alarm, ts *, AlarmType);
        void InterruptHandler();
        void ClearInterrupt(Alarm);
        void EnableDisableAlarm(Alarm, bool);
        void WriteToSRAM(uint8_t, uint8_t);
        uint8_t ReadFromSRAM(uint8_t);
        void ReadAllRegisters();
        void DumpRegisters(const uint8_t *);
        void ReadSRAM();
        void DumpSRAM();

    private:
        //
        //  Constants.
        //
        static const int REGISTER_SIZE = 0x14;
        static const int DATE_TIME_REGISTERS_SIZE = 0x07;
        static const int MEMORY_SIZE = 0xff;
        //
        //  Variables
        //
        int m_ChipSelect = -1;
        int m_MOSI = -1;
        int m_MISO = -1;
        int m_Clock = -1;
        uint8_t m_Registers[REGISTER_SIZE];
        uint8_t m_SRAM[MEMORY_SIZE];
        BitBang *m_Port;
        //
        //  Make the default constructor private so it cannot be called explicitly.
        //
        DS3234RealTimeClock();
        //
        //  Methods.
        //
        void Initialise(const uint8_t, const uint8_t, const uint8_t, const uint8_t);
        void SetRegisterValue(const Registers, uint8_t);
        uint8_t GetRegisterValue(const Registers);
        uint8_t ConvertUint8ToBCD(const uint8_t);
        void BurstTransfer(uint8_t *, uint8_t);
        void BurstTransfer(uint8_t *, uint8_t *, uint8_t);
        uint8_t ConvertBCDToUint8(const uint8_t);
};

#endif

Perversely, this discussion will start with the private data items and methods as these underpin the way in which the class provides the higher-level functionality.

Constants

The three constants define the size of the various register and RAM space within the chip.

REGISTER_SIZE

Defines the total number of bytes in the register bank excluding the reserved and SRAM registers.

DATE_TIME_REGISTERS_SIZE

Number of bytes holding the current date and time information.

MEMORY_SIZE

Number of bytes of SRAM.

Private Member Variables

The private member variables hold the state information for the class.

As noted in the datasheet for the DS3234, communication with the DS3234 is over the SPI bus. The first version of this class uses a software SPI class BitBang to provide this functionality.

m_Clock, m_MOSI, m_MISO, m_ChipSelect

The software SPI class allows the user to change the pins that provide the MOSI, MISO and Clock input/outputs. These four member variables record the pins used to provide the soft SPI bus.

m_Port

Instance of the class providing the SPI service.

m_Registers

Internal copy of the registers (up to the reserved registers).

m_SRAM

Internal copy of the SRAM.

Methods

The private methods provide the low level functionality supporting the public methods. These methods provide functions such as initialisation, communication and data conversion.

DS3234RealTimeClock()

The default constructor is made private to ensure that the developer cannot call this accidentally, forcing the use of the constructors that define the properties of the soft SPI bus.

void Initialise(const uint8_t chipSelect, const uint8_t mosi, const uint8_t miso, const uint8_t clock)

The four parameters inform the class which pins are used for the MOSI, MISO, Clock and Chip Select functions.

uint8_t ConvertBCDToUint8(const uint8_t value)

The values in the registers recording the date / time hold BCD values. This method provides a way to convert the DS3234 BCD values into a more natual (for the developer) uint8_t value.

uint8_t ConvertUint8ToBCD(const uint8_t value)

As noted above (see ConvertBCDToUint8), the DS3234 uses BCD to hold time vales. This methods provdes a method to convert uint8_t values to BCD before they are written to the registers.

uint8_t GetRegisterValue(const Registers reg)

Read a value from the specified register.

void SetRegisterValue(const Registers reg, const uint8_t value)

Set the specified register reg to value.

void BurstTransfer(uint8_t *dataToChip, uint8_t size) and void BurstTransfer(uint8_t *dataToChip, uint8_t *dataFromChip, uint8_t size)

As noted in the hardware discussion, the DS3234 will automatically increment the “address register” if multiple bytes of data are written to the SPI bus. These two methods take advantage of this functionality.

The first variant of the overloaded method, BurstTransfer(uint8_t *dataToChip, uint8_t size), transfers a number of bytes defined by size to the SPI bus. No data is read from the bus.

The second method, BurstTransfer(uint8_t *dataToChip, uint8_t *dataFromChip, uint8_t size), both writes and reads size bytes to/from the SPI bus.

In both cases, the first byte of the dataToChip buffer is set to the address of the first register to be read/written.

DS3234 Software – Public Interface

The public interface is the useful part of this class as it provides the functionality that is usable by the application developer.

Enumerated Types

The first group of items in the public interface are a series of enumerated types. These allow a meaningful name to be given to the various registers, bits within the registers and method parameters.

Alarm

There are two alarms on the DS3234, Alarm1 and Alarm2. These have slightly different capabilities as defined in the next enum.

enum Alarm { Alarm1, Alarm2, Both, Unknown };

This enum is also used to represent the type of alarm that has been generated.

AlarmType

The AlarmType represents the type of alarm being set. These have been put into two groups, one for each of the alarms:

enum AlarmType { OncePerSecond, WhenSecondsMatch, WhenMinutesSecondsMatch,  // Alarm 1 options.
                 WhenHoursMinutesSecondsMatch, WhenDateHoursMinutesSecondsMatch, WhenDayHoursMinutesSecondsMatch,
                 OncePerMinute, WhenMinutesMatch, WhenHoursMinutesMatch,    // Alarm 2 options.
                 WhenDateHoursMinutesMatch, WhenDayHoursMinutesMatch };

The first two lines represent the type of alarms that can be set on Alarm1, the second two lines can be used with Alarm2.

ControlRegisterBits

The values in this enum are the flags in the control register:

enum ControlRegisterBits { A1IE = 0x01, A2IE = 0x02, INTCON = 0x04, RS1 = 0x08, RS2 = 0x10, Conv = 0x20, BBSQW = 0x40, NotEOSC = 0x80 };

Two or more options can be set by or-ing the flags.

StatusRegisterBits

The status register as actually a combination of a number of bits that indicate the status of the DS3234 as well as some that control the action of the DS3234.

enum StatusRegisterBits { A1F = 0x02, A2F = 0x02, BSY = 0x04, EN32Khz = 0x08, Crate0 = 0x10, Crate1 = 0x20, BB32kHz = 0x40, OSF = 0x80 };

RateSelect

It is possible to generate a square wave at one of four frequencies on the interrupt pin. These flags determine the frequency of the generated signal:

enum RateSelect { OneHz = 0, OnekHz = 1, FourkHz = 2, EightkHz = 3 };

Registers

There are a total of 25 register addresses on the DS3234, containing information about the time, alarms and various other functions of the DS3234. This enumeration contains the addresses of several of the registers excluding the time register addresses:

enum Registers { ReadAlarm1 = 0x07, WriteAlarm1 = 0x87,
                 ReadAlarm2 = 0x0b, WriteAlarm2 = 0x8b,
                 ReadControl = 0x0e, WriteControl = 0x8e,
                 ReadControlStatus = 0x0f, WriteControlStatus = 0x8f,
                 ReadAgingOffset = 0x10, WriteAgingOffset = 0x90, 
                 ReadSRAMAddress = 0x18, WriteSRAMAddress = 0x98,
                 ReadSRAMData = 0x19, WriteSRAMData = 0x99 };

The current time register addresses have been excluded as there are methods available to set and get the time using the ts structure.

DayOfWeek

The day of the week is represented by a number inthe range 1 to 7. The actual day represented is arbitary and Sunday has been selected for the number 1:

enum DayOfWeek { Sunday = 1, Monday, Tuesday, Wednesday, Thursday, Friday, Saturday };

Constructor and Destructor

As already noted, the default constructor has been made private but two public constructors have been created. This ensures that the developer is forced to define one or more of the parameters for the SPI bus.

DS3234RealTimeClock(const uint8_t chipSelect)

The only parameter to this constructor is the pin to be used for chip select.

If this constructor is used the default pins are used for MOSI, MISO and SCLK.

DS3234RealTimeClock(const uint8_t chipSelect, const uint8_t mosi, const uint8_t miso, const uint8_t clock)

Using this method, the developer can override all of the pins used for the SPI bus.

~DS3234RealTimeClock()

Destructor to release all of the resources held by the instance of the class.

Methods

All of the high level functionality of the class is exposed by the public methods.

uint8_t GetAgingOffset() & SetAgingOffset(uint8_t agingOffset)

Get or set the value for the aging offset register. This is the value used to apply to the oscillator to compensate for variations in temperature.

float GetTemperature()

Get the current temperature.

uint8_t GetControlStatusRegister()

Get the current contents of the control register.

void SetControlRegister(const uint8_t controlRegister)

Set the control register to the specified value. The ControlRegisterBits can be or-ed together to build up the required value.

ts *GetDateTime()

Get the current date and time.

void SetDateTime(ts *dateTime)

Set the current date and time to the specified value.

String DateTimeString(ts *theTime)

Convert theDate into a string using the format dd-mon-yyyy hh-min-ss.

void SetAlarm(Alarm alarm, ts *time, AlarmType type)

Set the alarm time to time and the type of the alarm type to type.

void EnableDisableAlarm(Alarm alarm, bool enableOrDisable)

Turn the specified alarm on (if enableOrDisable is true) or off (if enableOrDisable is false).

void ClearInterrupt(Alarm alarm)

Clear the interrupt flag for the specified alarm. If both interrupt have been triggered then the application will need to clear both alarms in order to reset the interrupt line on the DS3234.

Alarm WhichAlarm()

Determine which alarm has generated the interrupt.

void InterruptHandler()

This method has been provided to allow the application to call a generic interrupt handler. This method is not currently implemented.

SRAM Methods

There are 256 bytes of battery backed up SRAM in the DS3234 and the following two methods expose this memory to the developer.

void WriteToSRAM(uint8_t address, uint8_t data)

Write a byte of data into the specified address in the battery backed up SRAM.

uint8_t ReadFromSRAM(uint8_t)

Read the byte of data at the specified address in the battery backed up SRAM.

Diagnostic Methods

The following methods are used for diagnostic purposes.

void ReadAllRegisters()

Read the contents of the entire register set within the DS3234 and place them in the internal private variable m_Registers variable.

void DumpRegisters(const uint8_t *)

Dump the regsiters to the serial port. The ReadAllRegisters should be called before calling this method.

void ReadSRAM()

Read the content of the SRAM and store this in the private internal m_SRAM variable.

void DumpSRAM()

Display the contents of the battery backed up SRAM to the serial port.

Example application

Several example applications were developed throughout the development of the library. The application below illustrates several of the key features of the library.

First thing that is needed is an instance of the DS3234 class:

DS3234RealTimeClock *rtc = new DS3234RealTimeClock(6);

Next up, we need to setup the DS3234 and attach an interrupt handler.

void setup()
{
    ts *dateTime;

    Serial.begin(9600);
    Serial.println("Setup in progress.");
    rtc->SetControlRegister(DS3234RealTimeClock::INTCON);
    rtc->ClearInterrupt(DS3234RealTimeClock::Alarm1);
    rtc->ClearInterrupt(DS3234RealTimeClock::Alarm2);

    //dateTime = new (ts);
    //dateTime->day = 27;
    //dateTime->wday = 5;
    //dateTime->month = 5;
    //dateTime->year = 2016;
    //dateTime->minutes = 05;
    //dateTime->hour = 13;
    //dateTime->seconds = 0;
    //rtc->SetDateTime(dateTime);

    dateTime = rtc->GetDateTime();
    dateTime->minutes += 2;
    if (dateTime->minutes >= 60)
    {
        dateTime->minutes -= 60;
    }
    dateTime->seconds = 0;
    Serial.print("Setting alarm for ");
    Serial.println(rtc->DateTimeString(dateTime));
    rtc->SetAlarm(DS3234RealTimeClock::Alarm1, dateTime, DS3234RealTimeClock::WhenMinutesSecondsMatch);
    rtc->EnableDisableAlarm(DS3234RealTimeClock::Alarm1, true);
    pinMode(5, INPUT_PULLUP);
    attachInterrupt(5, RTCInterrupt, FALLING);
    Serial.println("Setup complete.");
}

setup‘s first job is to clear any interrupts and set the DS3234 interrupt pin to generate an interrupt.

The next block of code which is commented out, allows the application to set the current date and time. This is only required when the application is first run or if the application is run with a DS3234 without a battery installed. If a battery is not installed then it may be desirable to get the current date and time for a time server if one is available.

The next step is to get the current date and time from the module and add two minute to the time, set the seconds for the alarm to 0 and then set an alarm for two minutes time. The first time this is run may generate an alarm somewhere between 1 and 2 minutes time. All subsequent alarms should occur at two minute intervals.

Setting the seconds for the alarm to 0 makes the first alarm appear at a seemingly random time. Consider the case when the application starts at 13:46:32. The application will set the alarm time to 13:48:00, i.e in 1 minute and 28 time and not 2 minutes. The following alarm will occur 2 minutes after the current alarm.

Finally, setup will set the interrupt behaviour on pin 5 of the microcontroller to trigger on the falling edge.

All of the work is performed in the setup method and the interrupt handler. This means that the main program loop does not contain any code:

void loop()
{
}

All of the work for this application is performed in the interrupt handler:

void RTCInterrupt()
{
    ts *dateTime;
    uint8_t count = 0;
    uint8_t minutes;

    rtc->ClearInterrupt(DS3234RealTimeClock::Alarm1);
    count = rtc->ReadFromSRAM(0x01);
    Serial.printf("Alarm %03d: ", ++count);
    dateTime = rtc->GetDateTime();
    Serial.println(rtc->DateTimeString(dateTime));
    rtc->WriteToSRAM(0x01, count);
    //
    //  Now reset the alarm.
    //
    minutes = dateTime->minutes;
    minutes += 2;
    if (minutes >= 60)
    {
        minutes = 0;
    }
    dateTime->minutes = minutes;
    Serial.print("Setting alarm for ");
    Serial.println(rtc->DateTimeString(dateTime));
    rtc->SetAlarm(DS3234RealTimeClock::Alarm1, dateTime, DS3234RealTimeClock::WhenMinutesSecondsMatch);
    delete(dateTime);
}

RTCinterupt is invoked then the interrupt pin of the DS3234 falls from high to low. This will happen when the specified alarm event occurs, in this case when the minutes and seconds of the current date / time match the value in Alarm1.

First thing to do is to clear the current interrupt taking the interrupt line from low back to high.

An interrupt counter is being stored in the battery backed up memory. This is read, incremented, displayed and then written back into the SRAM.

Finally, the alarm is reset to occur in two minutes.

Conclusion

DS3234 modules provide a method of recording time when the Internet is not available. The intention is to provide a way of taking readings and timestamping the readings when Internet connectivity is not available. Data can be uploaded when connectivity is restored and the time information will be retained.

The SRAM could be used to store readings along with a timestamp however, with only 256 bytes available this would not allow for a lot of readings and so another method will be investigated.

The DS3234 class can be downloaded from GitHub.