STM8S Timers
This post has been superseded by the post Using Timers on the STM8S in The Way of the Register series.
In the first post about this chip I showed how the internal clock could be output on a single pin. Here I am going to use one of the internal timers to generate my own clock signal. So in this post we will use two new concepts:
- GPIO pins to output a signal.
- Timer 2 to control the timing
- Interrupt Service Routines (ISR) to do the work
The program will work by setting up timer 2 to generate an interrupt on a regular basis. When the timer interrupt fires we will reverse the direction of a GPIO pin. The net result will be a clock signal with a frequency of twice that of the timer.
As with the previous post I will be using the IAR environment with the STD Peripheral Library.
Setting up the GPIO
The application sets up the GPIO port using the following code:
#define CLOCK_OUTPUT_PORT       GPIOD
#define CLOCK_OUTPUT_PIN        GPIO_PIN_3
These #defines hold the port and pin numbers we are going to use for the clock signal. So in this case we are using pin 3 on port D. Next we need to configure the port.
GPIO_DeInit(CLOCK_OUTPUT_PORT);
GPIO_Init(CLOCK_OUTPUT_PORT, CLOCK_OUTPUT_PIN, GPIO_MODE_OUT_PP_LOW_FAST);
The first statement resets the port so that we can configure the port. The second sets up pin 3 of port D for use. Note that you can use each pin on a port in a different way, so we could have pin 2 on port D as an input whilst pin 3 is an output. To do this you simply add more GPIO_Init statements under the first. Now let’s have a look at the final parameter to the GPIO_Init statement. This defines how the pin will be set up for us. You can decode this as follows:
- GPIO_MODE_OUT – this is an output port
- PP – the pin will be used in Push-Pull (as opposed to open drain). This means Setting the pin to 1 will make the pin high, setting it to 0 will make it low.
- LOW – the pin will start out low
- FAST – the pin will be used for fast signalling.
Setting up Timer 2
Next step is to configure the timer to interrupt on a regular basis. The first step is to set up the clock to use a known clock signal. For simplicity we will set this up to use the internal high speed clock source which runs at 16MHz. This code is similar to the code in the first post.
CLK_DeInit();
CLK_SYSCLKConfig(CLK_PRESCALER_CPUDIV1);                // CPU Prescaler = 1.
CLK_SYSCLKConfig(CLK_PRESCALER_HSIDIV1);                // Prescaler = 1, 16 MHz.
CLK_ClockSwitchConfig(CLK_SWITCHMODE_AUTO,              // Automatically switch
                      CLK_SOURCE_HSI,                   // Switch to internal timer.
                      DISABLE,                          // Disable the clock switch interrupt.
                      CLK_CURRENTCLOCKSTATE_DISABLE);   // Disable the previous clock.
The only real difference is that the prescaler for the system clock is set to 1 to give the full clock speed.
The next task is to set up the timer to run at a particular frequency:
TIM2_DeInit();
TIM2_TimeBaseInit(TIM2_PRESCALER_4096,      // Interrupt every 4096 clock pulses.
                  1);                       // Period is one.
TIM2_ITConfig(TIM2_IT_UPDATE, ENABLE);      // Enable the overflow interrupt.
TIM2_Cmd(ENABLE);
The comment interrupt every half millisecond is approximate as you will see when we come to take some measurements later.
The Interrupt Service Routine
The final piece of the puzzle is the interrupt service routine. These should always be small and fast. In this case we will simply toggle the specified clock pin to generate a clock signal.
All of the ISR’s are defined in the file stm8s_it.c. The ISR we will be working with is the timer 2 update overflow handler. This will fire when the counter for the timer overflows or becomes zero and the specified number of occurrences of this event have occurred. So in this file we need to locate this code:
INTERRUPT_HANDLER(TIM2_UPD_OVF_BRK_IRQHandler, 13)
{
}
and translate it to this:
INTERRUPT_HANDLER(TIM2_UPD_OVF_BRK_IRQHandler, 13)
{
    GPIO_WriteReverse(CLOCK_OUTPUT_PORT, CLOCK_OUTPUT_PIN);     // Generate a clock signal.
    TIM2->SR1 = (uint8_t) (~(uint8_t) TIM2_IT_UPDATE);          // Clear the interrupt.
}
The first line of the ISR toggles the specified bit. The second line is important as this clears the interrupt. If we do not do this then the system will return to this ISR as soon as we exit the routine.
Clock Signal
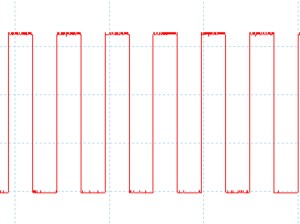
Compiling and deploying this code to the processor results in the following output on pin 3 of port D:
The scope we set up for 2 milliseconds per division and this looks about right. The exact frequency count comes out to be 976.6 Hz which is right if you divide the clock signal by the prescaler.
Tags: Electronics, Software Development, STM8
Saturday, May 12th, 2012 at 6:17 am • Electronics, Software Development, STM8 • RSS 2.0 feed Both comments and pings are currently closed.

