Rediscovering the STM32 Discovery Board
About a year ago I started to look at alternatives to the Netduino boards and came across the STM32 Discovery board. I spent a little time with this board and wrote a simple application which toggled a GPIO pin – the electronic equivalent of Hello, world. I have had very little time to spend with this board since then but now I feel it is time to revisit the STM32 having spent some time cutting my teeth on the STM8S.
Development Tools
I’m a hobbyist and this means I do not have a vast amount of money to spend on development tools and equipment. A quick survey of the market gives a few options for development tools (software). The prices put the majority if these out of the question for the home developer who does not intend to recover the costs. There are still a number of options open to us by using the restricted versions of the professional tools. Several of the major players have released limited editions of the full development suite. The normal seems to be restricting the amount of code the development environment can deal with before you are required to purchase the software. I have had a look at the following tools (presented in no particular order) over the past few days:
- Atollic TRUEStudio
Free Lite edition with a code restriction of 32K on the Cortex-M4 - IAR Embedded Workbench
Free kick starter edition available with a code limit of 32K - Keil MDK
No free version seems to be available and the site has a Quote button but no pricing. - GNU C/C++ with Eclipse IDE
Free with no code restriction - TASKING
No free edition available
A 32K code restriction does not seem unreasonable for the hobbyist so I decided to start with the IAR Kickstarter edition as I had a really good experience with the STM8S Kickstarter edition of the same development environment. I suppose the major driver was the fact that I will not have to learn a whole new series of key strokes in order to compile/debug as the IDE is the same as the STM8S version of the software which I have been using for nearly a year now.
Installation
Installation of the development environment was simple. The setup weighs in at a hefty 913 MBytes. Running the setup was painless and took only a few minutes.
Testing the installation
To test the deployment I decided to compile one of ST’s own example applications. These can be found in the firmware package which can be downloaded from ST’s web site. At the time of writing the latest version of the firmware was version 1.1.0. When you unzip the firmware you will find a Project directory which contains a number of samples including a Demonstration example. If you open this directory you will find a number of sub directories containing the projects for the various development tools available. We are interested in the EWARM directory as this contains the IAR project.
Opening the workspace STM32F4-Discovery_Demo.eww, compiling and deploying the application was simple. Just make sure that you have the STM32 Discovery board plugged into your computer using a mini USB connector through CN1 on the board.
Once deployed the IDE will halt program execution just before the main method is called. Pressing F5 will start the application running. At this point you should see the LEDs on the main board light up in a chase style pattern.
Template Application
The demonstration example shows how to use many of the development board features including the sensors, sound generation and the USB capabilities. The application therefore contains a number of features which we will/may not be using in our applications. I decided to strip the code down to a very basic application which can be used as a starting point for future application development. In order to prove that the template work and that we have not removed too much code we will recreate the previous application which toggled a GPIO pin.
There is a certain amount of startup code required in order to configure the STM32 and put it into a state where is can run an application. The code for this appears to be in the following files within the project:
- startup_stm32f4xx.s
- stm32f4xx_it.c
- system_stm32f4xx.c
The code in these file set up the interrupt tables and system clocks before passing control the main.
In order to ensure that I took as much of the configuration as possible over from the demonstration program I started with a copy of the contents of the entire directory and then started to remove files. Doing this would ensure that the project options were preserved.
To see some output we will need to add some code to output a signal on the scope. This application will toggle pin 0 on port D in a loop. The main program becomes:
GPIO_InitTypeDef  GPIO_InitStructure;

RCC_AHB1PeriphClockCmd(RCC_AHB1Periph_GPIOD, ENABLE);
int flag = 0;
GPIO_InitStructure.GPIO_Pin = GPIO_Pin_0;
GPIO_InitStructure.GPIO_Mode = GPIO_Mode_OUT;
GPIO_InitStructure.GPIO_OType = GPIO_OType_PP;
GPIO_InitStructure.GPIO_Speed = GPIO_Speed_100MHz;
GPIO_InitStructure.GPIO_PuPd = GPIO_PuPd_NOPULL;
GPIO_Init(GPIOD, &GPIO_InitStructure);
while (1)
{
    if (flag)
    {
        GPIO_SetBits(GPIOD, GPIO_Pin_0);
        flag = 0;
    }
    else
    {
        GPIO_ResetBits(GPIOD, GPIO_Pin_0);
        flag = 1;
    }
}
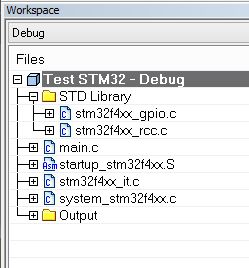
In order to use the GPIO pins we need to compile in the GPIO standard library. Specifically stm32f4xx_gpio.c and stm32f4xx_rcc.c. These are probably better added as a group so we add a group and then the files. This will leave the project structure looking something like the following:
Compiling the application gave a missing method/preprocessor directive, namely assert_param. I have come across this in the past. This method validates the parameters passed into the methods in the standard library methods. A quick addition of the following to main.h should make the code compile:
void assert_param(void *x) {}
Compile this and we get a whole lot of errors but at least it compiles. Strictly speaking this needs resolving but I still have to decide if long term I will be using the standard library or if I will be following another path. I remember getting burned by the STM8S version of the library. A decision for another day, for now I’ll continue with the template and the test application.
Saving all of this and then running the program with the scope hooked up to Port D, Pin 0 gives the following output on the scope:
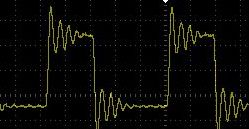
My only concern was the frequency of the output. The processor is supposed to be running at 168 MHz. I would have expected something higher than the 417 Khz I was getting.
A quick delve into the standard library and we find that the code which sets and resets the GPIO stat is actually simple. There are the mandatory calls to the assert_param method/preprocessor directive followed by a simple setting of a value. We can substitute the calls in the main loop with the actual code. The main loop now looks something like this:
while (1)
{
    if (flag)
    {
        GPIOD->BSRRL = GPIO_Pin_0;
        flag = 0;
    }
    else
    {
        GPIOD->BSRRH = GPIO_Pin_0;
        flag = 1;
    }
}
Deploying and running this application gives a lot more respectable output:
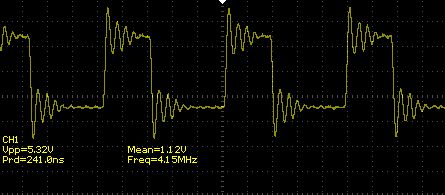
As you can see, we are getting a little over 4.1 MHz.
Conclusion
I now have a small template STM32 project which I can call upon at any time to give me a starting point for development with the STM32 Discovery board. I still need to work on the assert_param issue but only if I am to carry on working with the standard library.
If you are interested in using this template then feel free to download the code. You may need to make some adjustments to the default paths for the include directories. To do this:
- Right click on the project name (Test STM32 – Debug)
- Select Options…
- Now select C/C++ Compiler
- Scroll to the right until you find the Preprocessor tab
- Enter the paths for your include directories
A new year, a new journey. Let’s see where this takes us.
Tags: Electronics, Software Development, STM32
Tuesday, March 5th, 2013 at 5:23 pm • Electronics, Software Development • RSS 2.0 feed Both comments and pings are currently closed.
